HP iPAQ 316 HP iPAQ 300 Series Travel Companion - Product Guide - Page 17
To install the Travel Companion, mount the assembly into place.
 |
View all HP iPAQ 316 manuals
Add to My Manuals
Save this manual to your list of manuals |
Page 17 highlights
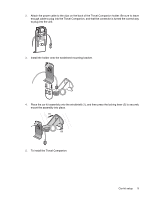
2. Attach the power cable to the clips on the back of the Travel Companion holder. Be sure to leave enough cable to plug into the Travel Companion, and that the connector is turned the correct way to plug into the unit. 3. Install the holder onto the windshield mounting bracket. 4. Place the car kit assembly onto the windshield (1), and then press the locking lever (2) to securely mount the assembly into place. 5. To install the Travel Companion: Car kit setup 9
-
 1
1 -
2
-
3
-
4
-
5
-
6
-
7
-
8
-
9
-
10
-
11
-
 12
12 -
 13
13 -
 14
14 -
 15
15 -
 16
16 -
 17
17 -
 18
18 -
 19
19 -
 20
20 -
 21
21 -
 22
22 -
23
-
24
-
25
-
26
-
27
-
28
-
29
-
30
-
31
-
32
-
33
-
34
-
35
-
36
-
37
-
38
-
39
-
40
-
41
-
42
-
43
-
44
-
45
-
46
-
47
-
48
-
49
-
50
-
51
-
52
-
53
-
54
-
55
-
56
-
57
-
58
-
59
-
60
-
61
-
62
-
63
-
64
-
65
-
66
-
67
-
68
-
69
-
70
-
71
-
72
-
73
-
74
-
75
-
76
-
77
-
78
-
79
-
80
-
81
-
82
-
83
-
84
-
85
-
86
-
87
 |
 |

2.
Attach the power cable to the clips on the back of the Travel Companion holder. Be sure to leave
enough cable to plug into the Travel Companion, and that the connector is turned the correct way
to plug into the unit.
3.
Install the holder onto the windshield mounting bracket.
4.
Place the car kit assembly onto the windshield (1), and then press the locking lever (2) to securely
mount the assembly into place.
5.
To install the Travel Companion:
Car kit setup
9