HP nx6330 HP Compaq nx6330 Notebook PC - Maintenance and Service Guide - Page 192
Recovery, Scheduling Backups
 |
View all HP nx6330 manuals
Add to My Manuals
Save this manual to your list of manuals |
Page 192 highlights
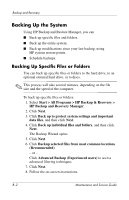
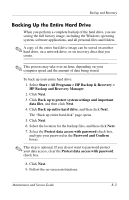
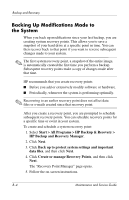
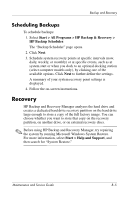
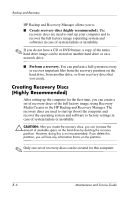
Backup and Recovery Scheduling Backups To schedule backups: 1. Select Start > All Programs > HP Backup & Recovery > HP Backup Scheduler. The "Backup Scheduler" page opens. 2. Click Next. 3. Schedule system recovery points at specific intervals (now, daily, weekly, or monthly) or at specific events, such as at system start or when you dock to an optional docking station (select computer models only), by clicking one of the available options. Click Next to further define the settings. A summary of your system recovery point settings is displayed. 4. Follow the on-screen instructions. Recovery HP Backup and Recovery Manager analyzes the hard drive and creates a dedicated hard drive recovery partition on the hard drive large enough to store a copy of the full factory image. You can choose whether you want to store that copy on the recovery partition, on another drive, or on external recovery discs. ✎ Before using HP Backup and Recovery Manager, try repairing the system by running Microsoft Windows System Restore. For more information, select Start > Help and Support, and then search for "System Restore." Maintenance and Service Guide B-5
-
 1
1 -
2
-
3
-
4
-
5
-
6
-
7
-
8
-
9
-
10
-
11
-
12
-
13
-
14
-
15
-
16
-
17
-
18
-
19
-
20
-
21
-
22
-
23
-
24
-
25
-
26
-
27
-
28
-
29
-
30
-
31
-
32
-
33
-
34
-
35
-
36
-
37
-
38
-
39
-
40
-
41
-
42
-
43
-
44
-
45
-
46
-
47
-
48
-
49
-
50
-
51
-
52
-
53
-
54
-
55
-
56
-
57
-
58
-
59
-
60
-
61
-
62
-
63
-
64
-
65
-
66
-
67
-
68
-
69
-
70
-
71
-
72
-
73
-
74
-
75
-
76
-
77
-
78
-
79
-
80
-
81
-
82
-
83
-
84
-
85
-
86
-
87
-
88
-
89
-
90
-
91
-
92
-
93
-
94
-
95
-
96
-
97
-
98
-
99
-
100
-
101
-
102
-
103
-
104
-
105
-
106
-
107
-
108
-
109
-
110
-
111
-
112
-
113
-
114
-
115
-
116
-
117
-
118
-
119
-
120
-
121
-
122
-
123
-
124
-
125
-
126
-
127
-
128
-
129
-
130
-
131
-
132
-
133
-
134
-
135
-
136
-
137
-
138
-
139
-
140
-
141
-
142
-
143
-
144
-
145
-
146
-
147
-
148
-
149
-
150
-
151
-
152
-
153
-
154
-
155
-
156
-
157
-
158
-
159
-
160
-
161
-
162
-
163
-
164
-
165
-
166
-
167
-
168
-
169
-
170
-
171
-
172
-
173
-
174
-
175
-
176
-
177
-
178
-
179
-
180
-
181
-
182
-
183
-
184
-
185
-
186
-
 187
187 -
 188
188 -
 189
189 -
 190
190 -
 191
191 -
 192
192 -
 193
193 -
 194
194 -
 195
195 -
 196
196 -
 197
197 -
198
-
199
-
200
-
201
-
202
-
203
-
204
-
205
-
206
-
207
-
208
-
209
-
210
-
211
-
212
-
213
-
214
-
215
-
216
-
217
-
218
-
219
-
220
-
221
-
222
-
223
-
224
-
225
-
226
 |
 |