HP nx6330 Installing Windows Vista (TM) Business on HP Compaq Business 4400, 6 - Page 3
Preparing for installation - compaq
 |
View all HP nx6330 manuals
Add to My Manuals
Save this manual to your list of manuals |
Page 3 highlights
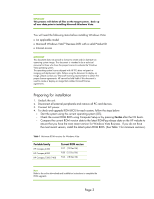
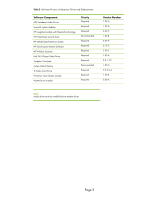
IMPORTANT This process will delete all files on the target system. Back up all user data prior to installing Microsoft Windows Vista. You will need the following items before installing Windows Vista: • An applicable model • Microsoft Windows VistaTM Business DVD with a valid Product ID • Internet access IMPORTANT This document does not provide a license to create and/or distribute an operating system image. This document is intended to be a technical resource for those who have the proper license to evaluate the Windows Vista operating system. The operating system license shipped with HP PCs does not grant reimaging and deployment rights. Before using the document to deploy an image, please contact your Microsoft licensing representative to obtain the proper license agreements. HP cannot be held liable if this document is used to create or deploy an image that violates Microsoft license agreements. Preparing for installation 1. Undock the unit. 2. Disconnect all external peripherals and remove all PC card devices. 3. Connect AC power. 4. To check and upgrade ROM BIOS for each system, follow the steps below. - Start the system using the current operating system (OS). - Check the current ROM BIOS using Computer Setup or by pressing Fn+Esc after the OS boots. - Compare the current ROM version date to the latest ROMPaq release date on the HP website to ensure that you have the most recent version for Windows Vista Business. If you do not have the most recent version, install the latest system ROM BIOS. (See Table 1 for minimum versions.) Table 1 Minimum ROM versions for Windows Vista Portable family HP Compaq 4400 HP Compaq 6300 HP Compaq 7300/7400 Current ROM version F.07 (12 Dec 06) F.0B (15 Dec 06) F.0A (18 Dec 06) Note Refer to the online download and installation instructions to complete the ROM upgrade. Page 3
-
 1
1 -
 2
2 -
 3
3 -
 4
4 -
 5
5 -
 6
6 -
 7
7
 |
 |