HP rp3440 Rack to Tower and Tower to Rack System Conversion Guide, Second Edit - Page 13
Converting a Rack System to a Tower System, remove:rack system from rack enclosure
 |
View all HP rp3440 manuals
Add to My Manuals
Save this manual to your list of manuals |
Page 13 highlights
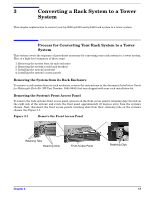
3 Converting a Rack System to a Tower System This chapter explains how to convert your hp 9000 rp3410 and rp3440 rack system to a tower system. Process for Converting Your Rack System to a Tower System This section covers the sequence of procedures necessary for converting your rack system to a tower system. Here is a high-level summary of these steps: 1. Removing the system from its rack enclosure 2. Removing the system's rack latch brackets 3. Installing the system's pedestal 4. Installing the system's access panels Removing the System from its Rack Enclosure To remove a rack system from its rack enclosure, reverse the instructions in the document Installation Guide for Midweight Slide Kit (HP Part Number: 5064-9640) that was shipped with your rack installation kit. Removing the System's Front Access Panel To remove the rack system's front access panel, press in on the front access panel's retaining clips (located on the right side of the system) and rotate the front panel approximately 45 degrees away from the system's chassis. Next, disconnect the front access panel's retaining slots from their retaining tabs on the system's chassis. See Figure 3-1. Figure 3-1 Remove the Front Access Panel Retaining Tabs Retaining Slots Front Access Panel Retaining Clips Chapter 3 13
-
 1
1 -
2
-
3
-
4
-
5
-
6
-
7
-
 8
8 -
 9
9 -
 10
10 -
 11
11 -
 12
12 -
 13
13 -
 14
14 -
 15
15 -
 16
16 -
 17
17 -
 18
18 -
19
-
20
-
21
-
22
-
23
-
24
-
25
-
26
-
27
-
28
-
29
-
30
 |
 |
