HP s300 HP s300 Digital Camera - User Manual - Page 16
Camera Buttons, Navigation Control
 |
View all HP s300 manuals
Add to My Manuals
Save this manual to your list of manuals |
Page 16 highlights
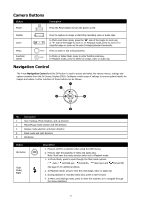
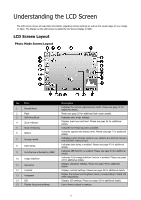
Camera Buttons Button Power Description Press the Power button to turn the power on/off. Shutter Zoom Menu Function/ Delete Press to capture an image or start/stop recording video or audio clips. In Photo and Video mode, press the "W" side of the toggle to zoom out, or "T" side of the toggle to zoom in. In Playback mode, press to zoom in to magnify image or zoom out to enter 9-image/calendar thumbnails. Press to enter or exit menu/submenu. In Photo or Video Mode, press to enter function submenu. In Playback mode, press to delete an image, video or audio clip. Navigation Control The 4-way Navigation Control and the OK button is used to access and select the various menus, settings and options available from the On Screen Display (OSD). Configure a wide range of settings to ensure optimal results for images and videos. Further functions of these buttons are as follows: 1 5 2 4 3 No. Description 1 Face Tracking, Photo Rotation, and up direction 2 Macro/Focus mode selector and left direction 3 Display mode selection and down direction 4 Flash mode and right direction 5 OK Button Button OK Button Flash Mode/ Right Description 1. Press to confirm a selection when using the OSD menus. 2. Press to start the playback of video and audio clips. Note: Must have the mode selector switch set to Playback mode. 1. In Photo Mode, press to cycle through the flash mode options. ( Auto, Anti Red-eye, Forced On, Slow Sync and Forced Off) See page 25 for additional details. 2. In Playback mode, press to view the next image, video or audio clip. 3. During playback of recorded video clips, press to fast forward. 4. In Menu and Settings mode, press to enter the submenu or to navigate through the menu selections. 12
-
 1
1 -
2
-
3
-
4
-
5
-
6
-
7
-
8
-
9
-
10
-
 11
11 -
 12
12 -
 13
13 -
 14
14 -
 15
15 -
 16
16 -
 17
17 -
 18
18 -
 19
19 -
 20
20 -
 21
21 -
22
-
23
-
24
-
25
-
26
-
27
-
28
-
29
-
30
-
31
-
32
-
33
-
34
-
35
-
36
-
37
-
38
-
39
-
40
-
41
-
42
-
43
-
44
-
45
-
46
-
47
-
48
-
49
-
50
-
51
-
52
-
53
-
54
-
55
-
56
-
57
-
58
-
59
-
60
-
61
-
62
-
63
-
64
-
65
-
66
-
67
-
68
-
69
-
70
-
71
-
72
-
73
-
74
-
75
-
76
-
77
-
78
-
79
-
80
-
81
-
82
-
83
 |
 |
