HP s510 HP s510 Digital Camera - User Manual - Page 13
Turning the Power On and Off, Initial Settings, Modes
 |
View all HP s510 manuals
Add to My Manuals
Save this manual to your list of manuals |
Page 13 highlights
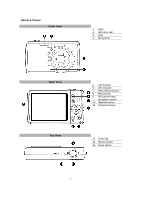
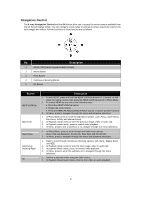
Turning the Power On and Off There are two ways to power on the camera: • Press the Power button, and the startup image displays briefly and the startup sound plays if enabled. The lens will extend and the camera is ready to take photos or record video. • Press the Playback button, and the camera is in Playback mode. The zoom lens is not extended. To power off the camera, press the Power button. Initial Settings When you power on your camera for the first time, you will be asked to do the initial settings of your camera. First is the setup of language menu. Specify in which language menus and messages are to be displayed on the LCD monitor. Setting the Language 1. Use the 4-way navigation control to move through the selections. 2. Select a language, and then press OK to apply. Setting the Date & Time 1. Use the 4-way navigation control to move through the selections. 2. Press Up/Down key on the navigation control to change the value for the date and time. 3. Press OK to apply. 4. If necessary, press to close the menu. Now, you are ready to start taking photos and videos. Holding down Up/Down key on the navigation control to change the values continuously. Modes Your camera has three modes: Record Mode This is the default mode while you power on the camera every time. You are able to take photos and record audio clips in this mode. Playback mode Press the Playback button after the camera is turned on to view and edit captured photos or playback videos and audio clips. The recording of voice memo attached to images is available in this mode. Video Record mode Press the Video Record button after the camera is start/stop recording video in this mode. 12
-
 1
1 -
2
-
3
-
4
-
5
-
6
-
7
-
 8
8 -
 9
9 -
 10
10 -
 11
11 -
 12
12 -
 13
13 -
 14
14 -
 15
15 -
 16
16 -
 17
17 -
 18
18 -
19
-
20
-
21
-
22
-
23
-
24
-
25
-
26
-
27
-
28
-
29
-
30
-
31
-
32
-
33
-
34
-
35
-
36
-
37
-
38
-
39
-
40
-
41
-
42
-
43
-
44
-
45
-
46
-
47
-
48
-
49
-
50
-
51
-
52
-
53
-
54
-
55
-
56
-
57
-
58
-
59
-
60
-
61
-
62
-
63
-
64
-
65
-
66
 |
 |
