HP t5325 HP ezUpdate Administrator's Guide - Page 5
Creating a Custom Update, Add the following lines
 |
View all HP t5325 manuals
Add to My Manuals
Save this manual to your list of manuals |
Page 5 highlights
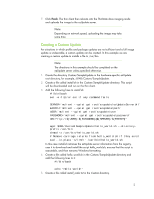
7. Click Finish. The thin client then reboots into the ThinState drive imaging mode and uploads the image to the ezUpdate server. Note: Depending on network speed, uploading the image may take some time. Creating a Custom Update For situations in which profile and package updates are not sufficient and a full image update is undesirable, a custom update can be created. In this example we are creating a custom update to installs a file to /usr/bin. Note: The directions in this example should be completed on the ezUpdate server unless specified otherwise. 1. Create the directory Custom/SampleUpdate in the hardware-specific ezUpdate root directory, for example, t5745/Custom/SampleUpdate. 2. Create a file called install.sh in the Custom/SampleUpdate directory. This script will be downloaded and run on the thin client. 3. Add the following lines to install.sh: #!/bin/bash set -e # Error out if any command fails SERVER=`mclient --quiet get root/ezupdate/ezUpdateServerUrl` EZPATH=`mclient --quiet get root/ezupdate/path` USER=`mclient --quiet get root/ezupdate/user` PASSWORD=`mclient --quiet get root/ezupdate/password` URL="ftp://${USER}:${PASSWORD}@${SERVER}/${EZPATH}" wget $URL/Custom/SampleUpdate/hello_world.sh --directoryprefix /usr/bin chmod +x /usr/bin/hello_world.sh # Remove carriage returns from hello_world.sh if they exist sed --in-place 's/\r$//' /usr/bin/hello_world.sh In this case install.sh retrieves the ezUpdate server information from the registry, uses it to download and install the script hello_world.sh, ensures that the script is executable, and then removes Windows formatting. 4. Create a file called hello_world.sh in the Custom/SampleUpdate directory and add the following lines to it: #!/bin/bash echo "Hello world!" 5. Create a file called install_order.txt in the Custom directory. 5
-
 1
1 -
 2
2 -
 3
3 -
 4
4 -
 5
5 -
 6
6 -
 7
7 -
 8
8 -
 9
9
 |
 |
