HP t5740 Troubleshooting Guide: HP t5740/t5745 Thin Clients and HP st5742/st57 - Page 17
Replacing the Secure USB Compartment Cover
 |
View all HP t5740 manuals
Add to My Manuals
Save this manual to your list of manuals |
Page 17 highlights
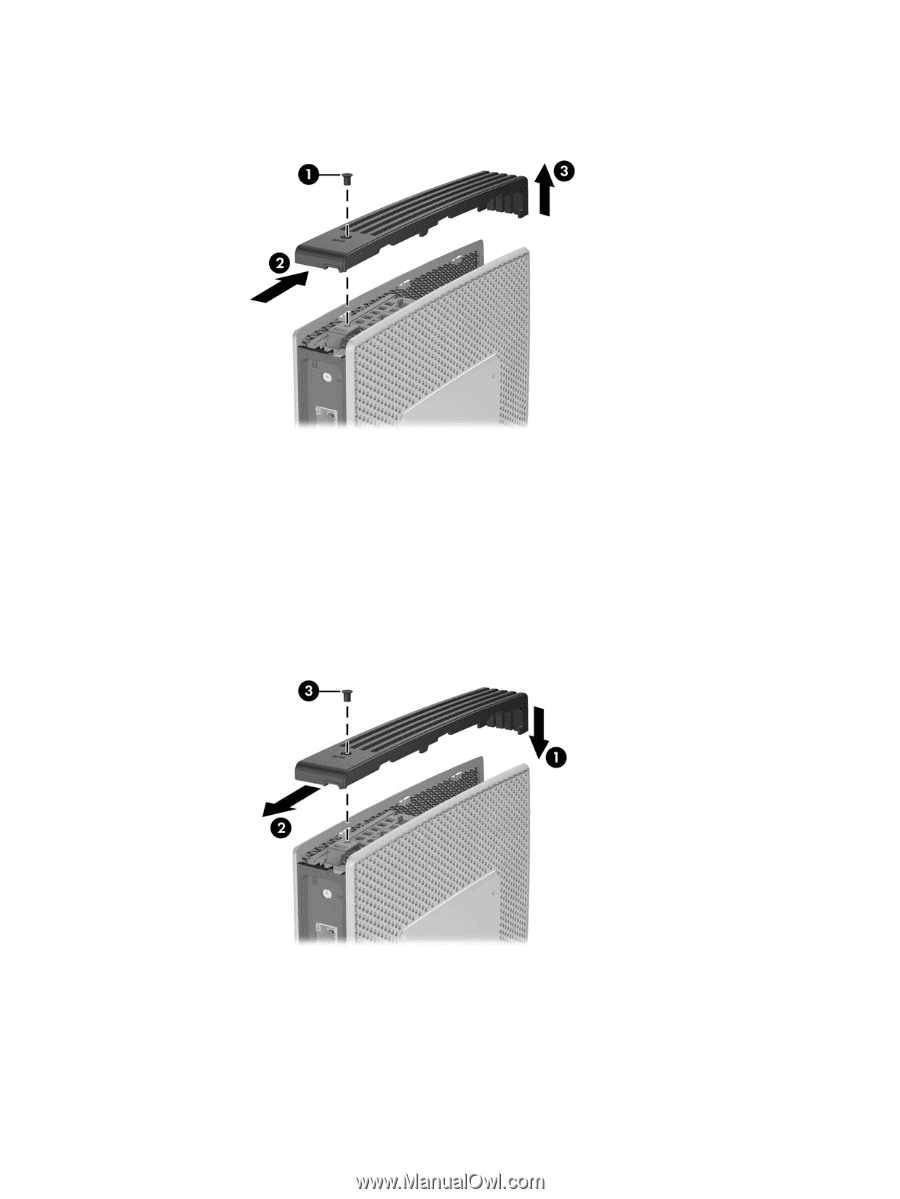
3. Remove the cover from the unit by first lifting the rear (screw side) of the cover, and then lifting the cover off the unit (3). Figure 2-1 Removing the secure USB compartment cover Replacing the Secure USB Compartment Cover To replace the secure compartment cover: 1. Place the cover on top of the unit so it is offset about 1.27 cm (1/2 inch) toward the rear of the unit, allowing the tabs on the cover to align and insert into the slots on the chassis (1). 2. Slide the cover toward the back of the unit until it locks in place and the cover is flush with the front panel of the chassis (2). 3. Replace the screw (3). Figure 2-2 Replacing the secure compartment cover Removing and Replacing the Secure USB Compartment Cover 9
-
 1
1 -
2
-
3
-
4
-
5
-
6
-
7
-
8
-
9
-
10
-
11
-
 12
12 -
 13
13 -
 14
14 -
 15
15 -
 16
16 -
 17
17 -
 18
18 -
 19
19 -
 20
20 -
 21
21 -
 22
22 -
23
-
24
-
25
-
26
-
27
-
28
-
29
-
30
-
31
-
32
-
33
-
34
-
35
-
36
-
37
-
38
-
39
-
40
-
41
-
42
-
43
-
44
-
45
-
46
-
47
-
48
-
49
-
50
-
51
-
52
-
53
 |
 |
3.
Remove the cover from the unit by first lifting the rear (screw side) of the cover, and then lifting
the cover off the unit (3).
Figure 2-1
Removing the secure USB compartment cover
Replacing the Secure USB Compartment Cover
To replace the secure compartment cover:
1.
Place the cover on top of the unit so it is offset about 1.27 cm (1/2 inch) toward the rear of the
unit, allowing the tabs on the cover to align and insert into the slots on the chassis (1).
2.
Slide the cover toward the back of the unit until it locks in place and the cover is flush with the
front panel of the chassis (2).
3.
Replace the screw (3).
Figure 2-2
Replacing the secure compartment cover
Removing and Replacing the Secure USB Compartment Cover
9