HP t5740 Creating and Restoring Images on the HP Thin Client with Altiris Depl - Page 3
Creating an Altiris backup image, Creating an Altiris backup image remotely using deployment server - user guide
 |
View all HP t5740 manuals
Add to My Manuals
Save this manual to your list of manuals |
Page 3 highlights
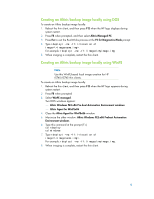
method to capture and deploy the image is to do this with the FBWF disabled, whether using no write filter at all or using just EWF. After the image is deployed, convert the system back to FBWF using the sample jobs if desired. If you are using older machines that do not support PXE or a network that does not have a DHCP PXE environment, you can install an Altiris BootWorks Partition on the drive. You can install BootWorks remotely using Altiris Deployment Server or locally on the thin client. For more information about Boot- Works, see the Altiris Deployment Server User Guide. Creating an Altiris backup image Altiris Deployment Solution comes with sample scripts for executing jobs and tasks on HP thin clients. You can find jobs for creating and distributing disk images which properly handle the EWF partition in the Jobs pane under the HP Thin Clients heading. HP recommends capturing and deploying images using the EWF and not the FBWF, though the FBWF can be changed using the sample jobs and re-enabled after the imaging is complete. You can also create jobs manually as shown in the following section. Creating an Altiris backup image remotely using deployment server To create an Altiris backup image remotely using Altiris Deployment Server: 1. In the jobs pane, expand Samples\HP Thin Clients\Windows XP Embedded. 2. Click Create Disk Image. 3. Double-click Create Disk Image in the right pane (detail pane). 4. Select the Automation pre-boot environment. Be sure to use either a Windows Preinstall Environment (WinPE) or a Linux pre-boot environment on the HP t5740/t5745 thin client. 5. Click Next. 6. Click Finish. 7. Drag and drop the Create Disk image job under Samples\HP Thin Clients\Windows XP Embedded. 8. Click Yes to ignore the warning message and continue scheduling the imaging job. The Schedule Computers for Job screen is displayed. 9. Select one of the following options, and then click OK. Do not schedule Run this job immediately Schedule this job The system reboots and begins the image capture process. 3
-
 1
1 -
 2
2 -
 3
3 -
 4
4 -
 5
5 -
 6
6
 |
 |
