Hitachi 51S715 Owners Guide
Hitachi 51S715 Manual
 |
View all Hitachi 51S715 manuals
Add to My Manuals
Save this manual to your list of manuals |
Hitachi 51S715 manual content summary:
- Hitachi 51S715 | Owners Guide - Page 1
COLOR TV Operating Guide for 57S715, 51S715 IMPORTANT SAFETY INSTRUCTIONS 2-3 FIRST TIME USE ...4-19 THE REMOTE CONTROL 20-39 ON-SCREEN DISPLAY...40-71 CARE OF YOUR HITACHI TV AND REMOTE CONTROL 72 RECEPTION PROBLEMS ...73 USEFUL INFORMATION ...74-77 57" DISASSEMBLY/ASSEMBLY INSTRUCTIONS 78 - Hitachi 51S715 | Owners Guide - Page 2
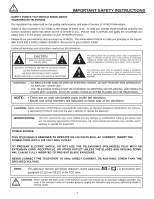
fill out your warranty card and mail it to HITACHI. This will enable HITACHI to notify you promptly in the improbable event that a safety problem should be discovered in your product model. Follow all warnings and instructions marked on this television. CAUTION RISK OF ELECTRIC SHOCK DO NOT OPEN - Hitachi 51S715 | Owners Guide - Page 3
. ANTENNA LEAD IN WIRE GROUND CLAMP ELECTRIC SERVICE EQUIPMENT NEC NATIONAL ELECTRICAL CODE ANTENNA DISCHARGE UNIT (NEC SECTION 810-20) GROUNDING CONDUCTORS (NEC SECTION 810-21) GROUNDING CONDUCTORS POWER SERVICE GROUNDING ELECTRODE SYSTEM (NEC ART 250 PART H) Note to the CATV system installer - Hitachi 51S715 | Owners Guide - Page 4
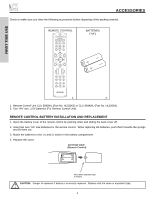
of the packing material. REMOTE CONTROL BATTERIES ("AA") GUIDE C.C. 1. 2. 1. Remote Control Unit CLU-3842WL (Part No. HL02062) or CLU-3844WL (Part No. HL02064). 2. Two "AA" size, 1.5V batteries (For Remote Control Unit). REMOTE CONTROL BATTERY INSTALLATION AND REPLACEMENT 1. Open the battery - Hitachi 51S715 | Owners Guide - Page 5
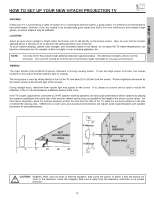
of the room. If the TV's audio output will be connected to a Hi-Fi system's external speakers, the best audio performance will be obtained by placing the speakers equidistant from each side of the receiver cabinet and as close as possible to the height of the picture screen center. For best stereo - Hitachi 51S715 | Owners Guide - Page 6
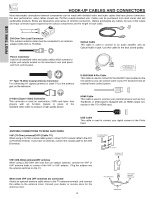
Optical Audio In jack. Use this cable for the best sound quality. Phono Connector Used on all standard video and audio cables which connect to inputs and outputs located on the television the TV antenna terminal, and connect the cables to the antenna mixer. Consult your dealer or service store for - Hitachi 51S715 | Owners Guide - Page 7
sound level. The volume level will be displayed on the TV screen. These buttons also serve as the cursor left (̇) and right (̈) buttons when in MENU mode. When the TV power is turned OFF at a volume level 31 or greater, the volume level will default to 30 when the TV is turned ON. However, if it is - Hitachi 51S715 | Owners Guide - Page 8
USB slot is provided to view digital still pictures from your digital camera using a USB cable and displaying them on the TV screen. PHOTO INPUT USB CABLE First, connect your digital camera to the Photo Input using a USB cable. Turn on the power of your digital camera. Press the INPUTS button - Hitachi 51S715 | Owners Guide - Page 9
the component CB output to the TV's PB input and the component CR output to the TV's PR input. 4. It may be necessary to adjust TINT to obtain optimum picture quality when using the Y-PBPR inputs (see page 44). 5. To ensure no copyright infringement, the MONITOR OUT output will be abnormal, when - Hitachi 51S715 | Owners Guide - Page 10
CENTER (INPUTS 1-4) These jacks are for stereo amplifiers with center signal output capability. This feature allows the TV speakers to be used as a center speaker. The TV must be set as a center channel by selecting "TV as Center" on the Internal Speakers Settings of the Audio Menu (see page 48). 10 - Hitachi 51S715 | Owners Guide - Page 11
HDMIIN1SERT THIS END OPTICAL OUT Digital Audio Upgrade Card Apparatus Claims of U.S. Patent Nos. 4,631,603; 4,577,216; 4,819,098; 4,907,093; and 6,381,747 licensed for limited viewing uses only. RS232C 1 2 345 6 789 If the CableCARD is properly installed or not installed, the TV will display the - Hitachi 51S715 | Owners Guide - Page 12
PR (MONO) (MONO) (MONO) (MONO) TV AS CENTER CableCARD (Top of card faces right) OPTICAL OUT Digital Audio Upgrade Card Apparatus Claims of U.S. Patent Nos. 4,631, output capability HDMI OUT To an amplifier/receiver with optical input capability. INPUT S-VIDEO V L R OUTPUT S-VIDEO V L R OUTPUT - Hitachi 51S715 | Owners Guide - Page 13
video connection if your device has this feature. • If your device has only one audio output (mono sound), connect it to the left audio jack on the television. • Refer to the operating guide of your other electronic equipment for additional information on connecting your hook-up cables. • A single - Hitachi 51S715 | Owners Guide - Page 14
Match the numbers below to the diagram for speaker placement. ᕃ The television's internal speakers will act as center speaker (select Audio-Internal Speakers-TV as Center). ᕄ These FRONT left and right speakers are connected to the FRONT output of a separate audio amplifier. ᕅ These REAR left and - Hitachi 51S715 | Owners Guide - Page 15
HDTV Set Top Box to your TV set is dependent on the model and features of each component. Check the owner's manual of each component for the location of video and audio inputs and outputs the INPUTS menu. Use ) (MONO) (MONO) TV AS CENTER OPTICAL OUT Digital Audio Upgrade Card Apparatus Claims of - Hitachi 51S715 | Owners Guide - Page 16
rear panel jacks. The picture and sound that is played back will be abnormal if the connection is loose. 2. A single VCR can be used for VCR #1 and VCR #2 (see page 12), but note that a VCR cannot record its own video or line output. Refer to your VCR operating guide for more information on line - Hitachi 51S715 | Owners Guide - Page 17
VIDEO PB INPUT 1 Y/ VIDEO PB HDMI 1 VIDEO L AUDIO R AUDIO TO HI-FI PR PR (MONO) (MONO) (MONO) (MONO) TV AS CENTER CableCARD (Top of card faces right) OPTICAL OUT Digital Audio Upgrade Card Apparatus Claims of U.S. Patent Nos. 4,631,603; 4,577,216; 4,819,098; 4,907,093; and 6,381,747 licensed - Hitachi 51S715 | Owners Guide - Page 18
1 2 345 6 789 HDMI Cable HDMI Output DVD Player or HDTV STB ANT B MONITOR OUT S-VIDEO INPUT 4 INPUT 3 INPUT 2 Y/ VIDEO PB INPUT 1 Y/ VIDEO PB HDMI 1 VIDEO L AUDIO R AUDIO TO HI-FI PR PR (MONO) (MONO) (MONO) (MONO) TV AS CENTER OPTICAL OUT Digital Audio Upgrade Card Apparatus Claims of - Hitachi 51S715 | Owners Guide - Page 19
(MONO) (MONO) (MONO) TV AS CENTER CableCARD (Top of card faces right) OPTICAL OUT Digital Audio Upgrade Card Apparatus Claims of U.S. Patent Nos. 4,631,603; 4,577,216; 4,819,098; 4,907,093; and 6,381,747 licensed for limited viewing uses only. RS232C 1 2 345 6 789 OUTPUT R L PR PB Y DVD Player - Hitachi 51S715 | Owners Guide - Page 20
of the Source Access on the remote (see page 36 for instructions on how to program the remote to control additional Audio/Video equipment). GUIDE C.C. NOTE: When you are in a dark room, press any button on the remote to light up the buttons. The illumination will light for a few seconds during this - Hitachi 51S715 | Owners Guide - Page 21
YOUR TV ቢ ባ ቤ ብ ቦ ቧ ቩ ቨ GUIDE ቫ ቪ ቭ ቮ ቯ ቱ C.C. ተ ቲ ታ ታ ቴ ት THE REMOTE CONTROL ቢ POWER button Press this button to turn the TV set on or off when the remote is in TV mode. (See page 20 for instructions on how to set the remote control to TV mode.) ባ MODE Indicator Turns on - Hitachi 51S715 | Owners Guide - Page 22
REMOTE TO CONTROL YOUR TV ቧ ASPECT button Press this button to quickly change the picture format ASPECT ratio. Depending on the input signal format received, the picture area of the picture will age more rapidly than mode to display 16:9 sources like HDTV and DVD's preserving the original 16:9 - Hitachi 51S715 | Owners Guide - Page 23
REMOTE TO CONTROL YOUR TV ቨ DAY/NIGHT button Press this button to toggle between Day and Night picture mode picture mode settings, see page 59. ቩ PICTURE-IN-PICTURE button See separate section on pages 29-30 for a description. ቪ MENU button The MENU button will start the On-Screen Display. ቫ GUIDE - Hitachi 51S715 | Owners Guide - Page 24
TO CONTROL YOUR TV ተ INPUTS button When the remote control is in TV mode, press this button to access the INPUTS menu. Use the CURSOR PAD and SELECT button to select the inputs that are being used. Pressing the INPUTS button repeatedly will also cycle through the Inputs menu items. Then press the - Hitachi 51S715 | Owners Guide - Page 25
Name JUMP Select this menu item to view the chosen picture number. Jump Slideshow Rotate Jump 7 0 Please Enter Picture Number - - THE REMOTE CONTROL NOTES: 1. Contrast will decrease automatically if stationary images such as digital still photos are left on the screen for more than 3 minutes - Hitachi 51S715 | Owners Guide - Page 26
REMOTE TO CONTROL YOUR TV SLIDESHOW Select this menu picture of the slideshow. After 30 seconds, the slideshow will resume, or press SELECT again to continue the slideshow. Press EXIT to exit the slideshow. ROTATE Select this menu "dcim" file name format. 3. Supported image types are up to 3072 x - Hitachi 51S715 | Owners Guide - Page 27
REMOTE TO CONTROL YOUR TV ቱ INFO button Press this button when you want to check the channel being received, the picture HD 1080i View --:-- AM --:-- PM 4:3 Expanded Event Timer DIGITAL CHANNELS TV Time 3:32PM Picture : 1. The Sleep Timer info will show momentarily after releasing INFO button - Hitachi 51S715 | Owners Guide - Page 28
page 69). When the TV power is turned off at a volume level 31 or greater, the volume level will default to 30 when the TV is turned on. However, if to your Favorite channel list by pressing and holding down the Channel (CH) wheel until the displayed channel turns from WHITE to highlighted GREEN - Hitachi 51S715 | Owners Guide - Page 29
THE REMOTE CONTROL PICTURE-IN-PICTURE (PIP) Your HITACHI Projection TV incorporates Two Tuner technology designed for improved viewing enjoyment. This Two Tuner feature allows you to view antenna inputs on both the main picture and sub-picture simultaneously, with separate tuning control for each. - Hitachi 51S715 | Owners Guide - Page 30
evenly on the screen. Main Picture Sub Picture SURF MODE PICTURE-IN-PICTURE Surf Mode PIP automatically scans all active channels (those set in memory) and displays them as PIP sub-pictures or Thumbnail channels. Press the SELECT button to stop on a chosen channel. Use the remote CURSOR PADS to - Hitachi 51S715 | Owners Guide - Page 31
picture you are currently viewing (only the right sub-picture will freeze). Press the EXIT button to return to normal viewing. Main Picture Sub Picture THE REMOTE mode you selected before you pressed the EXIT button will be the one that comes up after pressing the PAUSE button again. 2. Each - Hitachi 51S715 | Owners Guide - Page 32
ቢ PRECODED CABLE BOX buttons These buttons transmit the chosen precoded cable codes. ባ EXCLUSIVE TV buttons These buttons are for operating the TV. ባ ቢ ቢ THE REMOTE CONTROL MY CABLE BOX CODE IS: NOTE: Refer to instruction manual of the Cable Box for operation of the buttons exclusively for - Hitachi 51S715 | Owners Guide - Page 33
RECEIVER buttons ባ ቢ These buttons transmit the chosen pre-coded set-top- box/satellite codes. ቢ ባ EXCLUSIVE TV buttons These buttons are for operating the TV. THE REMOTE CONTROL MY SATELLITE RECEIVER/STB CODE IS: NOTE: Refer to instruction manual of the set-top-box/satellite receiver for - Hitachi 51S715 | Owners Guide - Page 34
procedure as stated above. ቢ GUIDE ባ ቢ ቢ PRECODED DVD Buttons These buttons transmit the chosen precoded DVD codes. ባ EXCLUSIVE TV Buttons These buttons are for operating the TV. ባ ባ C.C. ባ ቢ THE REMOTE CONTROL MY DVD PLAYER CODE IS: NOTE: Refer to instruction manual of the DVD player for - Hitachi 51S715 | Owners Guide - Page 35
VCR/PVR Buttons These buttons transmit the chosen precoded VCR/PVR codes. ባ EXCLUSIVE TV Buttons These buttons are for operating the TV. ቢ ቢ ባ GUIDE ቢ C.C. ባ ቢ ቢ THE REMOTE CONTROL MY VCR/PVR CODE IS: NOTE: Refer to instruction manual of the VCR/PVR for operation of the buttons exclusively for - Hitachi 51S715 | Owners Guide - Page 36
after performing the above procedures, please consult your Audio equipment operating guide. 3. The remote control will remember the codes you have programmed until the batteries are removed from the remote control. After replacing the batteries repeat the entire programming procedure as stated above - Hitachi 51S715 | Owners Guide - Page 37
) button on the remote and enter the four digit preset code that matches your device remote will now control the desired device. 7. Pressing the ENTER (ENT) button will now access the video input (1-5) of the desired device. SETUP EXAMPLE (Hitachi DVD with precode 0573 connected to INPUT 1 of the TV - Hitachi 51S715 | Owners Guide - Page 38
CABLE, SATELLITE, DVD AND AUDIO CODES FOR REMOTE CONTROL THE REMOTE CONTROL VCR BRAND CODE ABS 1972 Admiral 0048, 0209 Adventura 0072 Headquarter 0046 Hewlett Packard 1972 Hitachi 0000, 0041, 0042, 0105 Howard Computers 1972 Hughes Network Systems 0042 iBuy Power 1972 JVC 0067, 0041, 0008 - Hitachi 51S715 | Owners Guide - Page 39
AND AUDIO CODES FOR REMOTE CONTROL THE REMOTE CONTROL NSC . . 0891, 0110, 0189 Hewlett Packard 1181 Hitachi 0228 Integra 0135 JBL 0110 JVC 0074, 1263 KLH Pictures 0317, 0351 RCA 0056 SSI 0317 Sansui 0325 Schneider 0376 Sony 0010, 0576 Soundesign 0376 Yorx 0376 SET TOP BOX BRAND CODE - Hitachi 51S715 | Owners Guide - Page 40
the different features on your HITACHI Projection TV. 2. Press the CURSOR PAD to navigate and highlight a different feature of the On-Screen Display menu. 3. Press EXIT on the remote control to quickly exit from a menu. GUIDE This part of the screen shows which selections are available. Video - Hitachi 51S715 | Owners Guide - Page 41
Sources. Select internal or external speakers. Eliminates the noise between stations. Adjust volume in fixed setting. Adjust Loudness. Select Language options if available. Select Optical Output options. Select Dynamic Range Compression to ON or OFF. Choose the picture format aspect ratio. NOTE - Hitachi 51S715 | Owners Guide - Page 42
Set Channel List. Change Lock access code. Choose to lock channel, video input, and/or front panel. Set specific time to Lock TV. Block various types of movies and video types based on motion picture ratings. Block various types of movies and television programming based on a parental guide ratings - Hitachi 51S715 | Owners Guide - Page 43
SCREEN DISPLAY VIDEO Video Select VIDEO to adjust picture settings and improve picture will reset to initial conditions. Picture Mode Use this function to choose from automatic picture settings to optimize your TV Reset the video menu settings on current input to the Day or Night conditions - Hitachi 51S715 | Owners Guide - Page 44
menu items BRIGHTNESS, COLOR, TINT, and SHARPNESS can be selected and adjusted in the same manner. 2. Contrast will decrease automatically if stationary images such as digital photos are left on the screen for more than 3 minutes. 3. It may be necessary to adjust TINT to obtain optimum picture - Hitachi 51S715 | Owners Guide - Page 45
Menu Settings of the present input and return it to the Day VIDEO mode. Video Picture only Video:1 Input will return to factory conditions. Video Picture Mode Contrast Brightness Color Off ON-SCREEN DISPLAY Color Management Use this function to adjust and balance the listed individual colors - Hitachi 51S715 | Owners Guide - Page 46
picture without degrading picture quality. Set NOISE REDUCTION to OFF if the TV experiences picture blocking. When Noise Reduction is ON, Sharpness function is disabled (grayed out). The Auto Movie Mode function turns is turned ON from the VIDEO menu, your Hitachi Projection Television will activate - Hitachi 51S715 | Owners Guide - Page 47
will control the left to right balance of the Projection TV internal speakers. SRS Based on the principles of the human hearing system, SRS technology delivers and exciting and realistic 3D Sound experience from just two external speakers (or) the two internal speakers of your HITACHI Television - Hitachi 51S715 | Owners Guide - Page 48
is useful when setting up the external speakers. ON - Select this feature if using the internal speakers only. TV as Center - Select this feature when setting up external speakers from a separate stereo system. The TV's speakers will work as the center speaker. OFF - Select this feature if you - Hitachi 51S715 | Owners Guide - Page 49
Internal Speakers On Auto Noise Cancel On Perfect Volume On Loudness On Move Change Value SEL Return Audio Language Digital Output DRC the TV is connected to an amplifier/receiver with a PCM only decoder; it will provide two independent soundtrack channels through the optical output - Hitachi 51S715 | Owners Guide - Page 50
. For example, it will be useful for centering the picture area at both the top and bottom of the picture with 480i/480P signal. Adjustable range is -10 (video center is toward bottom of screen) to +10 (video center is toward top of screen). Press the CURSOR PAD ̆, ̄, to select menu item. Press the - Hitachi 51S715 | Owners Guide - Page 51
Auto Channel Scan This feature will automatically store active TV channels in Auto Channel Scan memory. Chan. Manager Set The Antenna Auto Chan. Scan Signal Meter Channel List Move SEL Return Press NOTE: When a CableCARD is installed, Auto Channel Scan will not be available. ON-SCREEN DISPLAY 51 - Hitachi 51S715 | Owners Guide - Page 52
will Chan. Scan Signal Meter Channel List Move SEL Return Chan. Manager will not be available (grayed out) when watching analog channels. Channel List This function allows you to review CH ID Lock Use the CURSOR PAD to navigate the Channel List. Press the CURSOR PAD (̆, ̄) to select On or - Hitachi 51S715 | Owners Guide - Page 53
and video tapes based on motion picture ratings. Picturein-Picture will also be blocked automatically (see page 54). When TV RATINGS is selected, various types of television programming based on a parental guide ratings will be blocked. Picture-in-Picture will also be blocked automatically (see - Hitachi 51S715 | Owners Guide - Page 54
Code Engage Lock TV Time Lock Movie Ratings TV will be blocked. Press EXIT to quit the menu or select MOVIE RATING to return to the previous menu. Motion Picture TV will not block it. 2. Blocking "NOT RATED (NR)" programs may block emergency programming, sports, news, public service Television will - Hitachi 51S715 | Owners Guide - Page 55
the general public. When you receive such messages, the Projection Television will immediately tune to an EAS channel as directed by the EAS message. Please be advised that if the EAS channel is blocked using the Locks feature, you will not be able to tune to that channel. ON-SCREEN DISPLAY 55 - Hitachi 51S715 | Owners Guide - Page 56
television program in Canada that (Eng) you feel might be inappropriate in its content. Locks Change Access Code Engage Lock TV Time Lock Movie Ratings TV and television programs rated C8+ and higher (G, PG, 14+ and 18+) will be blocked automatically. Press EXIT to quit menu. SCREEN DISPLAY 56 - Hitachi 51S715 | Owners Guide - Page 57
in its content. Locks Change Access Code Engage Lock TV Time Lock Movie Ratings TV Ratings Canadian Ratings (Eng) Canadian television programs rated 8 ans+ and higher will be automatically blocked. Press EXIT to quit menu or select the CURSOR PAD ̇ to return to the previous menu SCREEN DISPLAY 57 - Hitachi 51S715 | Owners Guide - Page 58
, Day, and Year. Use the CURSOR PAD ̆, ̄ to adjust settings. Press the SELECT button to set the Time and Date. Press EXIT to quit the menu. NOTES: When "Daylight Saving Correction" is checked "✓", the TV will automatically calculate the clock adjustment for Daylight Saving. ON-SCREEN DISPLAY 58 - Hitachi 51S715 | Owners Guide - Page 59
30, 2:00, 2:30 and 3:00. Set Day/Night Timer Select this feature to activate and set your TV's Day/Night Picture Mode automatically. Timers Set The Clock Set Sleep Timer Set Day/Night Timer Set Event Timer Timers Set Day/Night to select Day Mode Off and to set it's timer. ON-SCREEN DISPLAY 59 - Hitachi 51S715 | Owners Guide - Page 60
pressed after viewing reservation is activated, the TV will automatically turn off after three hours. Therefore, do not Set Event Timer for more than three hours if you do not plan to control your television with the remote control. CAUTION: Do not use your TV as a deterrent when away from home by - Hitachi 51S715 | Owners Guide - Page 61
Set Virtual HD Set Black Side Panel Set Closed Captions Set Monitor Out About Your TV Move SEL Return Use the CURSOR PAD to highlight the sub-menu of your choice. Press the SELECT button to select. Setup CableCARD Info Set AV Control Upgrades Quick Start Up Move SEL Select ON-SCREEN DISPLAY 61 - Hitachi 51S715 | Owners Guide - Page 62
Focus Tune Up Auto Digital Convergence Adjustment Please turn ON your television for at least 20 minutes before using this feature. The Magic Focus button on control panel will not work when adjustment mode is set to Manual (see page 63 or 64). Your HITACHI Projection TV has three color projection - Hitachi 51S715 | Owners Guide - Page 63
turn ON your television for at least 20 minutes before using this feature. 2. Auto Adjustment Mode is recommended. If convergence is still not acceptable, use the Manual Adjustment Mode. 3. If Auto Adjust mode is selected or the Magic Focus button is pressed, all manual adjust mode settings will - Hitachi 51S715 | Owners Guide - Page 64
turn ON your television for at least 20 minutes before using this feature. 2. Auto Adjustment Mode is recommended. If convergence is still not acceptable, use the Manual Adjustment Mode. 3. If Auto Adjust mode is selected or the Magic Focus button is pressed, all manual adjust mode settings will - Hitachi 51S715 | Owners Guide - Page 65
SETUP Menu Preference This feature will allow you to select any one of three different languages for all on-screen displays. Setup Magic Focus Tune Up Menu Preference Set The Inputs Set Virtual HD Set Black Side Panel Set Closed Captions Set Monitor Out About Your TV Move SEL Return Setup Menu - Hitachi 51S715 | Owners Guide - Page 66
SOLID for a black background (no picture can be seen behind menu screen), or select SHADED for a light background. Set The Inputs Use this feature to give a name to any of the five video inputs. Setup Magic Focus Tune Up Menu Preference Set The Inputs Set Virtual HD Set Black Side Panel Set Closed - Hitachi 51S715 | Owners Guide - Page 67
EXIT to quit menu. NOTES: 1. Once the TV has been turned on using the AUTO LINK feature, it must be reset before AUTO LINK is used again. To do this, turn your VCR, laserdisc, or DVD player OFF. This feature is now reset and will turn on your TV as described above. 2. When using REMOTE mode, any - Hitachi 51S715 | Owners Guide - Page 68
set will always return to "Set Black Side Panel - OFF" setting every time the TV is powered "OFF". NOTE: To maximize operating life of the TV's picture tubes when watching 4:3 signal, Black Side Panel is cancelled at Power OFF. It is recommended to watch 4:3 signal with gray side bar. ON-SCREEN - Hitachi 51S715 | Owners Guide - Page 69
dialogue, narration, and/or sound effects of a television program or home video which are displayed on the TV screen. Your local TV program guide denotes these programs as or . Setup Magic Focus Tune Up Menu Preference Set The Inputs Set Virtual HD Set Black Side Panel Set Closed Captions Set - Hitachi 51S715 | Owners Guide - Page 70
TV Tuner Out is selected, Variable Audio Out will not be available (grayed out). About Your TV The TV model name and dimensions will be displayed on the TV screen. The dimensions of each TV model are listed on page 75. Setup Magic Focus Tune Up Menu Preference Set The Inputs Set Virtual HD Set - Hitachi 51S715 | Owners Guide - Page 71
the TV tuners circuits when the TV is in "standby mode" which is commonly referred to as "off". This will allow you to quickly tune to channels when first turning the TV on. Digital signals often change and this feature will monitor any changes and prepare the television to quickly present a picture - Hitachi 51S715 | Owners Guide - Page 72
CARE OF YOUR HITACHI TELEVISION AND YOUR REMOTE CONTROL DO Dust the screen and cabinet with a soft cloth. Clean the screen with a soft cloth moistened in warm water and dry with a soft cloth. A mild soap may be used if the screen is extremely dirty. Place your Television away from extreme heat, - Hitachi 51S715 | Owners Guide - Page 73
by interference from automobile ignition systems, neon lamps, electrical drills, ghosting of the image and weak signals. • BLACK SCREEN: When using an antenna, weak signals will display a black screen. It may be necessary to upgrade your antenna. NOTE: The TV set can generate sound distortion in - Hitachi 51S715 | Owners Guide - Page 74
poor © Picture OK, sound poor © © ©©© © © Picture blurred © © ©©© © Lines or streaks in picture © ©©© © Poor reception on some channels © ©©© © Picture rolls vertically © © No color © © ©©© © Poor color © © ©©© ©© HITACHI Projection Television incorporates advanced power surge - Hitachi 51S715 | Owners Guide - Page 75
-Use (3-Language) On-Screen Menu • Full Set of Input Jacks, including S-VIDEO • COMPONENT VIDEO: Y-PB/PR • Velocity Modulation • Six Aspect Modes • Closed Caption Decoder • 2-Tuner Picture in Picture • Magic Focus (Auto Digital Convergence and 9-point/117-point Manual Adjustment) • 2 Antenna - Hitachi 51S715 | Owners Guide - Page 76
made every effort to assure you hours of trouble free operation from your unit. However, should you require service, a network of Hitachi Authorized Service Facilities has been established in all 50 states and Puerto Rico. Each facility will provide you with convenient and expedient assistance. Our - Hitachi 51S715 | Owners Guide - Page 77
EST 9:00am - 7:00pm Saturday EST 9:00am - 5:00pm Look for your French Manual on the outside of the box. If the manual is missing, call 1-800-HITACHI (1-800-448-2244) for a copy. Pour de plus amples renseignements sur le service durant la période couverte par la garantie, sur le fonctionnement ou - Hitachi 51S715 | Owners Guide - Page 78
Television weighs over 206.3 pounds and has many sensitive components. CAUTION: DISCONNECT UNIT FROM POWER SOURCE BEFORE DISASSEMBLY / ASSEMBLY 1 - SEPARATION PROCEDURE (Note: read all instructions Before disassembling this projection TV set, you must first remove the speaker grille by grabbing the - Hitachi 51S715 | Owners Guide - Page 79
wrench that is provided inside of the instruction bag, see (a) and (b). (a) (b) STEP 6 Remove from the back side of the TV set only the top 4 screws of by two persons when separating this TV. This assembly contains fragile parts, such as glass and the viewing screen. Avoid any type of impact that - Hitachi 51S715 | Owners Guide - Page 80
STEP 13 Re-install the 2 screws that hold the back cover to the cabinet on the front side of the TV. STEP 14 Re-install both of the front decoration panels, see (a) and (b).. Re-install the speaker grille, aligning it with the bottom cabinet, see (c). This com- pletes the Disassembly and Assembly - Hitachi 51S715 | Owners Guide - Page 81
7, 62 Manual Convergence 63-64 Menu Preference Language 65 Background 66 Monitor Out 9, 70 N Noise Reduction 46 P Perfect Volume 48 Photo Input 7-8, 25-26 Picture Mode 43 Picture-in-Picture (PIP 29-31 Picture-outside-Picture (POP 29 R Remote Control Functions 20-39 Programming Codes 38 - Hitachi 51S715 | Owners Guide - Page 82
Hitachi America, Ltd., Home Electronics Division ("HAL-HED"). By using this Hitachi digital television product. Its component parts may not be separated content owner and may the export of goods or services, which currently include, but or have reason to know will utilize the Software in the - Hitachi 51S715 | Owners Guide - Page 83
AGREEMENT FOR HITACHI DTV SOFTWARE INCLUDING, BUT NOT LIMITED TO, PROCUREMENT OF SUBSTITUTE GOODS OR SERVICES; LOSS OF USE, DATA, OR PROFITS; OR BUSINESS INTERRUPTION) Federal Courts in the Southern District of California. If any part of this License Agreement is unenforceable, the remainder shall be - Hitachi 51S715 | Owners Guide - Page 84
QR60602
-
 1
1 -
 2
2 -
 3
3 -
 4
4 -
 5
5 -
 6
6 -
 7
7 -
8
-
9
-
10
-
11
-
12
-
13
-
14
-
15
-
16
-
17
-
18
-
19
-
20
-
21
-
22
-
23
-
24
-
25
-
26
-
27
-
28
-
29
-
30
-
31
-
32
-
33
-
34
-
35
-
36
-
37
-
38
-
39
-
40
-
41
-
42
-
43
-
44
-
45
-
46
-
47
-
48
-
49
-
50
-
51
-
52
-
53
-
54
-
55
-
56
-
57
-
58
-
59
-
60
-
61
-
62
-
63
-
64
-
65
-
66
-
67
-
68
-
69
-
70
-
71
-
72
-
73
-
74
-
75
-
76
-
77
-
78
-
79
-
80
-
81
-
82
-
83
-
84
 |
 |

PROJECTION COLOR TV
Operating Guide for 57S715, 51S715
IMPORTANT SAFETY INSTRUCTIONS
................................................................................
2-3
FIRST TIME USE
..................................................................................................................
4-19
THE REMOTE CONTROL
..................................................................................................
20-39
ON-SCREEN DISPLAY
........................................................................................................
40-71
CARE OF YOUR HITACHI TV AND REMOTE CONTROL
......................................................
72
RECEPTION PROBLEMS
........................................................................................................
73
USEFUL INFORMATION
....................................................................................................
74-77
57” DISASSEMBLY/ASSEMBLY INSTRUCTIONS
............................................................
78-80
INDEX
........................................................................................................................................
81
END USER LICENSE AGREEMENT FOR HITACHI DTV SOFTWARE
..............................
82-83
As an E
NERGY
S
TAR
®
Partner, Hitachi, Ltd. has determined that this
product meets the E
NERGY
S
TAR
®
guidelines for energy efficiency.