Hitachi DH40MRY Instruction Manual - Page 8
HOW TO USE - hammer drill
 |
UPC - 717709012141
View all Hitachi DH40MRY manuals
Add to My Manuals
Save this manual to your list of manuals |
Page 8 highlights
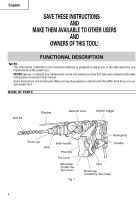
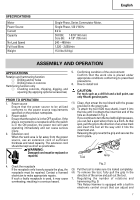
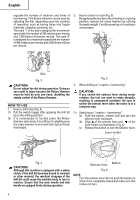
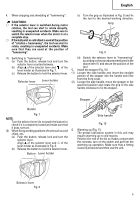
English regulate the number of rotations and times of 2. How to chisel or crush (Fig. 5) hammering. This Rotary Hammer can be used by By applying the tool tip to the chiseling or crushing adjusting the dial, depending upon the contents position, operate the rotary hammer by utilizing of operation, such as boring holes into fragile its empty weight. Forcible pressing or thrusting is materials, chipping, centering, etc. unnecessary. The scale '1' of the dial is designed for a minimum speed with the number of 240 rotations per minute and 1,320 times of blow per minute. The scale '6' is designed for a maximum speed with the number of 480 rotations per minute and 2,650 times of blow per minute. Dial Fig. 3 CAUTION: Do not adjust the dial during operation. Doing so can result in injury because the Rotary Hammer must be held by only one hand, disabling the steady control of the Rotary Hammer. HOW TO USE 1. How to drill holes (Fig. 4) (1) Pull the switch trigger after applying the drill bit tip to the drilling position. (2) It is unnecessary to forcibly press the Rotary Hammer main body. It is sufficient to slightly press the rotary hammer to an extent that clips are freely discharged. Fig. 5 3. When drilling at "rotation + hammering" CAUTION: If you switch the selector lever during motor rotation, the tool can start to rotate abruptly, resulting in unexpected accidents. Be sure to switch the selector lever when the motor is at a complete stop. (1) Switching to "rotation + hammering" (a) Push the button, release lock and turn the selector lever clockwise. (b) Align ▲ of the selector lever and of the lever holder as illustrated in Fig. 6. (c) Release the button to lock the selector lever. Lever holder Fig. 4 CAUTION: Although this machine is equipped with a safety clutch, if the drill bit becomes bound in concrete or other material, the resultant stoppage of the drill bit could cause the machine body to turn in reaction. Ensure that the main handle and side handle are gripped firmly during operation. Selector lever Button Fig. 6 NOTE: Turn the selector lever (do not push the button) to check if it is completely locked and make sure that it does not turn. 8
-
 1
1 -
2
-
 3
3 -
 4
4 -
 5
5 -
 6
6 -
 7
7 -
 8
8 -
 9
9 -
 10
10 -
 11
11 -
 12
12 -
 13
13 -
14
-
15
-
16
-
17
-
18
-
19
-
20
-
21
-
22
-
23
-
24
-
25
-
26
-
27
-
28
-
29
-
30
-
31
-
32
-
33
-
34
-
35
-
36
-
37
-
38
-
39
-
40
-
41
-
42
-
43
-
44
-
45
-
46
-
47
-
48
 |
 |
