Hitachi DZ-BD70AF Owners Guide - Page 122
Using ImageMixer 3, HD Edition for BDCAM
 |
UPC - 050585224094
View all Hitachi DZ-BD70AF manuals
Add to My Manuals
Save this manual to your list of manuals |
Page 122 highlights
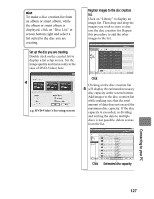
Using ImageMixer 3 HD Edition for BDCAM To launch ImageMixer 3 HD Edition for BDCAM, double click the ImageMixer 3 HD Edition for BDCAM shortcut which was created on your desktop at time of software installation. * If there is no shortcut for ImageMixer 3 HD Edition for BDCAM on the desktop, select "Start" → "Program" or "All programs" → "PIXELA" → "ImageMixer 3 HD Edition for BDCAM" → "ImageMixer 3 HD Edition for BDCAM". A detailed instruction manual for ImageMixer 3 HD Edition for BDCAM is provided as an electronic manual which you can access on your PC. Please refer to this manual for details by clicking "Help(H)" → "ImageMixer help(H) F1" on the menu at the top of the ImageMixer 3 HD Edition for BDCAM window. Copying images recorded on the camcorder to your PC and playing them back ImageMixer 3 HD Edition for BDCAM allows you to transfer movies and stills recorded on the camcorder to your PC and to play them back. Turn on the camcorder power and connect the camcorder to your PC. Set the camcorder to the medium you wish to use with the PC. Then connect the camcorder to your PC's USB terminal using the supplied PC connection cable (p.119). 1 To read the BD-R/DVD-RW/ DVD-R recorded on the camcorder into your PC, it is necessary to finalize the medium using the camcorder (p.113). Be sure to finalize it before connecting the camcorder to the PC. 2 Launch ImageMixer 3 HD Edition for BDCAM. Select Hitachi BDCAM*. When you click on "Hitachi BDCAM" appearing on the left side of the screen, the recorded images are displayed as thumbnails. 3 Click * "Hitachi BDCAM (HDD)" appears during HDD mode (DZBD7HA), and "Removable Disc" appears during Card mode. Connecting to your PC 122
-
 1
1 -
2
-
3
-
4
-
5
-
6
-
7
-
8
-
9
-
10
-
11
-
12
-
13
-
14
-
15
-
16
-
17
-
18
-
19
-
20
-
21
-
22
-
23
-
24
-
25
-
26
-
27
-
28
-
29
-
30
-
31
-
32
-
33
-
34
-
35
-
36
-
37
-
38
-
39
-
40
-
41
-
42
-
43
-
44
-
45
-
46
-
47
-
48
-
49
-
50
-
51
-
52
-
53
-
54
-
55
-
56
-
57
-
58
-
59
-
60
-
61
-
62
-
63
-
64
-
65
-
66
-
67
-
68
-
69
-
70
-
71
-
72
-
73
-
74
-
75
-
76
-
77
-
78
-
79
-
80
-
81
-
82
-
83
-
84
-
85
-
86
-
87
-
88
-
89
-
90
-
91
-
92
-
93
-
94
-
95
-
96
-
97
-
98
-
99
-
100
-
101
-
102
-
103
-
104
-
105
-
106
-
107
-
108
-
109
-
110
-
111
-
112
-
113
-
114
-
115
-
116
-
 117
117 -
 118
118 -
 119
119 -
 120
120 -
 121
121 -
 122
122 -
 123
123 -
 124
124 -
 125
125 -
 126
126 -
 127
127 -
128
-
129
-
130
-
131
-
132
-
133
-
134
-
135
-
136
-
137
-
138
-
139
-
140
-
141
-
142
-
143
-
144
-
145
-
146
-
147
-
148
-
149
-
150
-
151
-
152
-
153
-
154
-
155
-
156
-
157
-
158
-
159
-
160
-
161
-
162
-
163
-
164
-
165
-
166
-
167
-
168
-
169
-
170
-
171
-
172
-
173
-
174
-
175
-
176
-
177
-
178
-
179
-
180
-
181
-
182
-
183
 |
 |
