Hitachi DZ-BD70AF Owners Guide - Page 125
Creating a smart album, to automatically, assemble images
 |
UPC - 050585224094
View all Hitachi DZ-BD70AF manuals
Add to My Manuals
Save this manual to your list of manuals |
Page 125 highlights
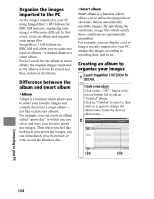
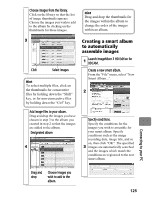
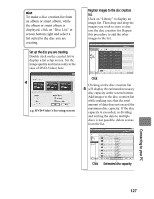
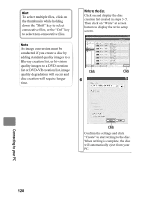
Choose images from the library. Click on the library so that the list of image thumbnails appears. Choose the images you wish to add to the album by clicking on the thumbnails for these images. Hint Drag and drop the thumbnails for the images within the album to change the order of the images within an album. 3 Click Select images Hint To select multiple files, click on the thumbnails for consecutive files by holding down the "Shift" key, or for non-consecutive files by holding down the "Ctrl" key. Creating a smart album to automatically assemble images 1 Launch ImageMixer 3 HD Edition for BDCAM. Create a new smart album. From the "File" menu, select "New Smart Album...". 2 Add image files to your album. Drag and drop the images you have chosen in step 3 to the album you created in step 2 so that the images are added to the album. Designated album 4 Specify conditions. Specify the conditions for the images you wish to assemble for your smart album. Specify conditions such as the image recording date, image title, and so on, then click "OK". The specified 3 images are automatically searched and the images which match the conditions are registered to the new smart album. Connecting to your PC Drag and drop Choose images you wish to add to the album. 125
-
 1
1 -
2
-
3
-
4
-
5
-
6
-
7
-
8
-
9
-
10
-
11
-
12
-
13
-
14
-
15
-
16
-
17
-
18
-
19
-
20
-
21
-
22
-
23
-
24
-
25
-
26
-
27
-
28
-
29
-
30
-
31
-
32
-
33
-
34
-
35
-
36
-
37
-
38
-
39
-
40
-
41
-
42
-
43
-
44
-
45
-
46
-
47
-
48
-
49
-
50
-
51
-
52
-
53
-
54
-
55
-
56
-
57
-
58
-
59
-
60
-
61
-
62
-
63
-
64
-
65
-
66
-
67
-
68
-
69
-
70
-
71
-
72
-
73
-
74
-
75
-
76
-
77
-
78
-
79
-
80
-
81
-
82
-
83
-
84
-
85
-
86
-
87
-
88
-
89
-
90
-
91
-
92
-
93
-
94
-
95
-
96
-
97
-
98
-
99
-
100
-
101
-
102
-
103
-
104
-
105
-
106
-
107
-
108
-
109
-
110
-
111
-
112
-
113
-
114
-
115
-
116
-
117
-
118
-
119
-
 120
120 -
 121
121 -
 122
122 -
 123
123 -
 124
124 -
 125
125 -
 126
126 -
 127
127 -
 128
128 -
 129
129 -
 130
130 -
131
-
132
-
133
-
134
-
135
-
136
-
137
-
138
-
139
-
140
-
141
-
142
-
143
-
144
-
145
-
146
-
147
-
148
-
149
-
150
-
151
-
152
-
153
-
154
-
155
-
156
-
157
-
158
-
159
-
160
-
161
-
162
-
163
-
164
-
165
-
166
-
167
-
168
-
169
-
170
-
171
-
172
-
173
-
174
-
175
-
176
-
177
-
178
-
179
-
180
-
181
-
182
-
183
 |
 |
