HoMedics BPA-150 User Manual - Page 8
Date & Time Set Procedure, Using The Ac Adapter
 |
View all HoMedics BPA-150 manuals
Add to My Manuals
Save this manual to your list of manuals |
Page 8 highlights
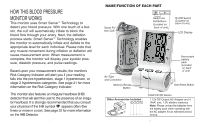
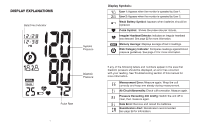
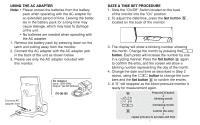
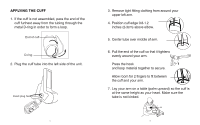
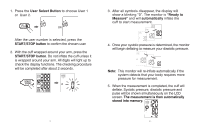
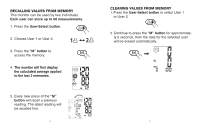
USING THE AC ADAPTER Note: • Please unload the batteries from the battery pack when operating with the AC adapter for an extended period of time. Leaving the batteries in the battery pack for a long time may cause leakage, which may lead to damage of the unit. • No batteries are needed when operating with the AC adapter. 1. Remove the battery pack by pressing down on the latch and pulling away from the monitor. 2. Connect the AC adapter with the AC adapter jack in the back of the unit as shown below. 3. Please use only the AC adapter included with this monitor. Connect AC adapter here AC Adapter Input: 120V 60Hz Output: 12V DC 500mA 13 DATE & TIME SET PROCEDURE 1. Slide the "On/Off" Switch located on the back of the monitor into the "On" position. 2. To adjust the date/time, press the Set button , located on the back of the monitor. 3. The display will show a blinking number showing the month. Change the month by pressing the button. Each press will increase the number by one in a cycling manner. Press the Set button again to confirm the entry, and the screen will show a blinking number representing the day of the month. 4. Change the date and time as described in Step 2 above, using the button to change the num- bers and the Set button to confirm the entries. 5. A "0" will reappear as the blood pressure monitor is ready for measurement again. Press the button blinking month increasing month confirm the entry repeat process to set date and time 14
-
 1
1 -
2
-
 3
3 -
 4
4 -
 5
5 -
 6
6 -
 7
7 -
 8
8 -
 9
9 -
 10
10 -
 11
11 -
 12
12 -
 13
13 -
14
-
15
-
16
-
17
-
18
-
19
-
20
-
21
-
22
-
23
-
24
-
25
-
26
-
27
-
28
-
29
-
30
-
31
-
32
-
33
-
34
 |
 |
