HoMedics BPA-200H User Manual - Page 14
Date & Time Set Procedure
 |
View all HoMedics BPA-200H manuals
Add to My Manuals
Save this manual to your list of manuals |
Page 14 highlights
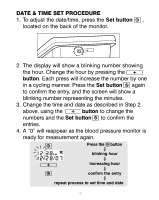
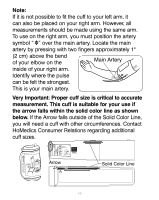
DATE & TIME SET PROCEDURE 1. To adjust the date/time, press the Set button , located on the back of the monitor. 2. The display will show a blinking number showing the hour. Change the hour by pressing the button. Each press will increase the number by one in a cycling manner. Press the Set button again to confirm the entry, and the screen will show a blinking number representing the minutes. 3. Change the time and date as described in Step 2 above, using the button to change the numbers and the Set button to confirm the entries. 4. A "0" will reappear as the blood pressure monitor is ready for measurement again. Press the button blinking hour increasing hour confirm the entry repeat process to set time and date 13
-
 1
1 -
2
-
3
-
4
-
5
-
6
-
7
-
8
-
 9
9 -
 10
10 -
 11
11 -
 12
12 -
 13
13 -
 14
14 -
 15
15 -
 16
16 -
 17
17 -
 18
18 -
 19
19 -
20
-
21
-
22
-
23
-
24
-
25
-
26
-
27
-
28
-
29
-
30
-
31
-
32
-
33
-
34
-
35
-
36
-
37
-
38
-
39
-
40
-
41
-
42
-
43
-
44
-
45
-
46
-
47
-
48
-
49
-
50
-
51
-
52
-
53
-
54
-
55
-
56
-
57
-
58
-
59
-
60
-
61
-
62
-
63
-
64
 |
 |

DATE & TIME SET PROCEDURE
1. To adjust the date/time, press the
Set button
,
located on the back of the monitor.
2. The display will show a blinking number showing
the hour. Change the hour by pressing the
button
. Each press will increase the number by one
in a cycling manner. Press the
Set button
again
to confirm the entry, and the screen will show a
blinking number representing the minutes.
3. Change the time and date as described in Step 2
above, using the
button
to change the
numbers and the
Set button
to confirm the
entries.
4. A “0” will reappear as the blood pressure monitor is
ready for measurement again.
13
Press the
button
blinking hour
increasing hour
confirm the entry
repeat process to set time and date