HoMedics DWS-110 User Manual - Page 2
Before You Begin, Setting Up The Wireless, Thermometer
 |
View all HoMedics DWS-110 manuals
Add to My Manuals
Save this manual to your list of manuals |
Page 2 highlights
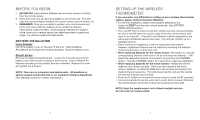
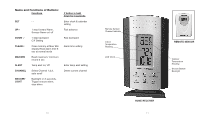
BEFORE YOU BEGIN: 1. IMPORTANT: Insert alkaline batteries into the home receiver unit first, then the remote sensor. 2. Place the home unit as close as possible to the remote unit. This will help with synchronization between the remote sensor and the home unit. 3. REMEMBER: Once you are ready to position your remote sensor and home unit, ensure that the distance is not outside the effective transmission range (100 feet). Some building materials and location of the home unit or remote sensor can affect transmission quality and range. Try various locations for best results. BATTERY INSTALLATION Home Receiver: Lift off the battery cover on the back of the unit. Install 2 alkaline AA batteries according to the polarity indicated. Close the battery cover. Remote Sensor: Remove the attached bracket stand. Loosen the 2 screws securing the battery cover with a small screwdriver and remove. Insert 2 alkaline AA batteries according to the polarity direction indicated. Replace the cover and tighten the 2 screws. NOTE: There are no consumer serviceable parts. All questions or service request should directed to our consumer relations department. (See Warranty section for contact information.) 2 SETTING UP THE WIRELESS THERMOMETER: If you encounter any difficulties in setting up your wireless thermometer system, please contact Consumer Relations. • For the first installation, always insert alkaline batteries to the home unit FIRST and then the remote sensor(s). (See BATTERY INSTALLATION section) • Your new RF Thermometer is built with random security code technology, the home unit will learn the random code of the first remote sensor and log it in as channel 1. Channel 2 and Channel 3 will be registered in the same way if additional sensors are used. This unit can monitor up to 3 separate sensors. • Once a channel is registered, it will not accept any new sensors. However, registered channels can be erased by removing the batteries in the remote sensor or the home unit. • When replacing batteries for the remote sensor- Remember to clear the corresponding channel of the home unit by removing the batteries. -OR- Select the respective channel of the sensor by pressing the CHANNEL button. Hold the CHANNEL button for 3 seconds to clear the registration. • When replacing batteries for the home receiver- Please remove the batteries of all remote sensors. Once you have replaced the home receiver batteries, re-install the batteries to the sensors according to the desired channel sequence. This will ensure that the unit and the remote sensors are properly synchronized. • Press the Tx button on the back of remote sensor to verify the RF reception. • It is recommended to test the units next to each other to ensure that both the remote sensor and home receiver are properly synchronized. NOTE: Keep the remote sensor out of direct sunlight and rain. Do not mount on metal surface. 3
-
 1
1 -
 2
2 -
 3
3 -
 4
4 -
 5
5 -
 6
6 -
 7
7 -
 8
8 -
9
-
10
-
11
-
12
 |
 |