HoMedics DWS-220 User Manual - Page 3
To Select Between Alarm 1, Alarm 2 Or Alarm Off
 |
View all HoMedics DWS-220 manuals
Add to My Manuals
Save this manual to your list of manuals |
Page 3 highlights
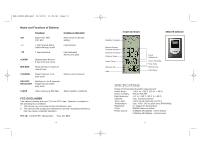
DWS-220SP-ENG.qxd 10/12/04 11:34 AM Page 5 Now you will select the calendar settings3. Select Year - Use the " + , - " buttons located on the back of the home receiver to adjust year setting. Press " SET " button to confirm. 4. Select Month/Day - Use the " + , - " buttons located on the back of the home receiver to adjust month/day setting. Press " SET " button to confirm. 5. Select Hour/Minute - Use the " + , - " buttons located on the back of the home receiver to adjust hour/minute setting. Press " SET " button to confirm. 6. DST On/Off (Daylight Savings Time) - Use the " + , - " buttons to turn DST on or off. Press " SET " button to confirm. FAHRENHEIT/CENTIGRADE SELECTION You can now select either Fahrenheit or Centigrade temperature readings. Hold the max/min button for 3 seconds to toggle between Fahrenheit or Centigrade readings. ALARM FUNCTIONS TO SELECT BETWEEN ALARM 1, ALARM 2 OR ALARM OFF Press " +/ " button on the back of the unit to scroll through selections. For Daily Alarm - The appropriate " " icon will appear in the upper left corner of the time display. No Alarm - The " " icons will not be shown. TO SET ALARM TIME 1. Press "ALARM" button once to select Alarm 1 or twice for Alarm 2. 2. Once you select the correct alarm, hold the "ALARM" button down for 3 seconds. 3. Set alarm time - Press " + , - " on the back of the unit to enter the desired Hr/ Min values. Press "ALARM" to confirm. 4. To view alarm time - Press "ALARM" button. Alarm time will display for 5 seconds and then resume to normal clock thereafter. 5. The home receiver will provide either a daily alarm, which last for 2 minutes or a snooze mode where the alarm will repeat every 5 minutes until manually cleared (see SNOOZE/LIGHT section below.) 6. To turn ringing alarm off - Simply press the button under the LCD display. The alarm is now off for one day. SNOOZE/ LIGHT 1. Press the SNOOZE/ LIGHT button for an extended backlight. 2. In snooze alarm mode, press this button to trigger a repetitive snooze alarm. 4 MIN/ MAX MEMORY SETTINGS 1. Press "MIN/ MAX" button to view the maximum values for 5 seconds. Press again to view the minimum values. 2. To clear the memory record, press "CLEAR" button on the back of the unit while the respective values are displayed on screen. TEMPERATURE TREND INDICATOR: Next to each weather reading on the home receiver LCD display, you will see one of 3 icons; will indicate Rising Conditions if it changes more than 1 degree in an hour will indicate Steady Conditions will indicate Falling Conditions if it is more than 1 degree in an hour. WEATHER FORECAST WITH STORM ALERT The built-in sensor will read the atmospheric pressure and calculate the weather conditions of the next 12 hours. These conditions will be displayed as; Sunny, Partial Sunny, Cloudy, Rainy, Stormy or Icy at the top of the LCD display. OFFSETTING AIR PRESSURE FOR WEATHER FORECAST After the initial step or in case the weather forecast deviates, you can still recalibrate the unit. 1. Hold "CLEAR" button for 3 seconds to enter the pressure offset mode. The weather icon will flash. 2. Select the existing weather condition by pressing "MAX/MIN" button. 3. Press "CLEAR" to confirm and exit. 4. The unit is now calibrated to the existing pressure and weather conditions. 5
-
 1
1 -
 2
2 -
 3
3 -
 4
4 -
 5
5 -
 6
6 -
 7
7 -
 8
8 -
 9
9 -
10
-
11
-
12
 |
 |
