HoMedics LT-500 User Manual - Page 3
The Color Cube Features, Assembly, Instructions for Use
 |
View all HoMedics LT-500 manuals
Add to My Manuals
Save this manual to your list of manuals |
Page 3 highlights
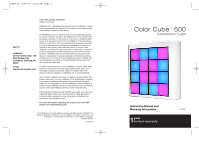
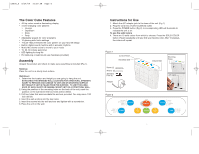
LT500_A 8/24/04 10:39 AM Page 5 The Color Cube Features • 48 hip colors create a fascinating display • 4 ever-changing color patterns • Lounge • Daydream • Doze • Party • Adjustable speeds for color programs • 10 glowing solid color settings • "Pause" feature freezes the color pattern on your favorite design • Built-in digital sound machine with 4 acoustic rhythms • Music Mic allows colors to move to your music • 15, 30, 60 minute auto-timer • LED lighting for long life • For table-top or wall-mount use (hardware provided) Assembly Unpack the product and check to make sure everything is included (Fig 1). Table-top Place the unit on a sturdy level surface. Wall-Mount 1. Determine the location and height you are going to hang the unit. NOTE:CHECK THE INTENDED WALL LOCATIONS FOR STRUCTURAL STRENGTH. INJURY TO PERSONS AND DAMAGE TO UNIT AND/OR MOUNTING SURFACE MAY RESULT IF UNIT IS PULLED FROM THE SURFACE. TO LIMIT THE LIKELIHOOD OF SUCH INJURY OR DAMAGE, MOUNT UNIT ON A STRUCTURAL WALL. 2. Using the position of the mounting holes on the back of the unit, mark the position on the wall where the two holes will be drilled. 3. Drill two holes that accommodate the anchors provided. You may use a 7/32 inch drill bit. 4. Insert the wall anchors into the two holes. 5. Insert the screws into the wall anchors and tighten with a screwdriver. 6. Place the unit on the wall. Instructions for Use 1. Attach the A/C adapter jack to the base of the unit (Fig 1). 2. Plug the cord into a 120V household outlet. 3. Press the POWER button (Fig 2). A corresponding LED will illuminate to indicate the unit is on. To use the solid colors 4. There are 10 solid colors from which to choose. Press the SOLID COLOR button (Fig 2) repeatedly until you find your favorite color. After 10 presses, the colors will repeat. Figure 1 Control Panel Sensitivity Dial Screw (2) Anchor (2) Adhesive Feet (4) Adaptor Volume Dial Mounting Holes A/C Jack Figure 2 4 5
-
 1
1 -
 2
2 -
 3
3 -
 4
4
 |
 |
