HoMedics UHE-WM85 Downloadable Instruction Book - Page 5
Cleaning and Care, About White Dust - instructions
 |
View all HoMedics UHE-WM85 manuals
Add to My Manuals
Save this manual to your list of manuals |
Page 5 highlights
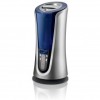
About White Dust: Use of high mineral content hard water may cause a white mineral residue to accumulate on surfaces in the room near the humidifier. The mineral residue is commonly called "white dust." The higher the mineral content (or, the harder your water is), the greater the potential for white dust. The white dust is not caused by a defect in the humidifier. It is caused only by minerals suspended in the water. How and Why To Use Demineralization Cartridges: The HoMedics demineralization cartridge will help reduce the potential for white dust, a deposit of minerals left behind from using hard water in your humidifier. The cartridge should be replaced every 30 - 40 fillings. The cartridge may need to be replaced more often if you are using very hard water. Replace the cartridge when you notice an increase in white dust build-up. If white dust still forms around the humidifier after a new cartridge has been installed, consider using distilled water. To purchase new demineralization cartridges, model # UHE-HDC4, go back to the retailer (where you purchased your humidifier), or visit www.homedics.com If you live in an area with hard water, or use a water softener, we recommend using distilled water for better results from your humidifier. Never use water softening additives in your humidifier. Installation Instructions 1. Remove demineralization cartridge from packaging and let it soak in water for 10 minutes. 2. Remove the tank from humidifier base and turn it over. 3. Unscrew the tank cap by turning the cap counter-clockwise. 4. Fill the tank with water as shown in the How to Fill section of the instructions included with your humidifier. 5. Add the soaked demineralization cartridge into the tank. 6. Replace the tank cap by turning clockwise. 7. Place the tank back on the base. Cleaning and Care CAUTION: Before cleaning the unit, turn power off and unplug unit from the outlet. Warm Cool MIST HUMIDISTAT Fig. 7 Fig. 8 Fig. 9 Warm Cool MIST TEMP TIMER HUMIDISTAT To Clean the Tank Remove the water tank from the humidifier base by lifting it from the main unit. Unscrew the tank cap and rinse inside the tank with clean water. (Fig. 7) To remove any scale or build up, use a 50/50 mixture of vinegar and lukewarm water to clean the inside of the tank. Suggestion: Clean the water tank once every two to three weeks, depending on your water conditions. To Clean the Ultrasonic Membrane Pour a 50/50 mixture of vinegar and water on the surface of the ultrasonic membrane, then soak for five minutes. Brush clean with a soft-bristle brush (not included) and rinse. NEVER touch the ultrasonic membrane with your fingers as the natural oils in skin can damage the membrane. (Fig. 8) Suggestion: Clean the membrane once every two to three weeks, depending on your water conditions. NOTE: Never submerge the base in water or any liquid To Clean the Surface Clean the surface of the unit with a clean damp soft cloth as often as needed. (Fig. 9) Demineralization Cartridge 8 9
-
 1
1 -
 2
2 -
 3
3 -
 4
4 -
 5
5 -
 6
6 -
 7
7 -
 8
8 -
 9
9 -
 10
10 -
 11
11 -
12
 |
 |
