HoMedics WFL-ISL User Manual - Page 3
Assembly and Instructions for Use
 |
View all HoMedics WFL-ISL manuals
Add to My Manuals
Save this manual to your list of manuals |
Page 3 highlights
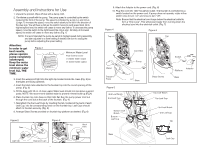
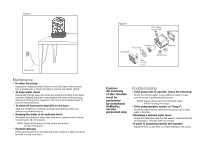
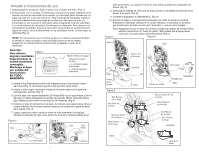
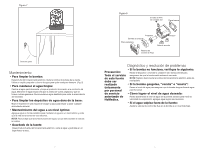
Assembly and Instructions for Use 1. Unpack the product. Wipe off dust with a damp cloth. 2. Familiarize yourself with the pump. The pump speed is controlled by the switch located at the front of the pump. The speed is indicated by a plus (+) and minus (-) sign. To increase the speed, move the switch slowly to the left in the direction of the plus sign. You will hear a click as the switch moves to each speed level. At its highest speed level, the switch will cease to move any further. To decrease the pump speed, move the switch to the right toward the minus sign. Similarly, at its lowest speed, the switch will cease to move any further. (Fig. 1) NOTE: It is recommended the pump be set at its highest speed during assembly and later adjusted to a lower setting if desired. Be sure to unplug the pump before adjusting the speed setting. Attention: In order to get best results, please operate pump completely submerged. Keep the water level above the minimum water level ALL THE TIME. Figure 1 Minimum Water Level Flow Control Lever (+) faster water output (-) slower water output 3. Insert the waterproof light into the light clip located inside the base (Fig. 2) so that lights are facing upwards. 4. Insert the black tube attached to the fountain top into the round opening of the pump. (Fig. 3) 5. Fill the base with 20 oz. of clean water. Water level should not rise above support posts. NOTE: We recommend distilled water to prevent mineral build-up.(Fig.4) 6. Place fountain top onto base so that it sits flat. Run the pump power cord out through the cord slot at the back of the fountain. (Fig. 4) 7. Next attach the four Leaf Cups by inserting the tab, located at the back of each Leaf Cup, into its corresponding notch on the fountain top. Leaf Cups should attach to fountain securely. (Fig. 5) 8. Arrange Glass Stones provided on fountain top platform as desired. (Fig. 6) Figure 2 Base Figure 3 Top Black Tube Light Clip Waterproof Light 4 Pump 9. Attach the Adaptor to the power cord. (Fig. 6) 10. Plug the cord into 120V household outlet. The fountain is controlled by a switch located on the power cord. If pump does not operate, rotate in-line switch once to turn "on" and once to turn "off". Note: Ensure that the electrical cord loops below the electrical outlet to form a "Drip Loop". This will prevent water from running down the electrical cord into the electrical outlet. (Fig. 7) Figure 4 Figure 6 Top Top Water Support Posts Figure 5 2nd Leaf Notch 2nd Leaf Cup Bottom Leaf Notch Bottom Leaf Cup Cord Slot Pump Base Switch Glass Stones Adaptor Platform Base Top Leaf Notch Top Leaf Cup 3rd Leaf Notch 3rd Leaf Cup Tab Base Leaf Cup 5
-
 1
1 -
 2
2 -
 3
3 -
 4
4 -
 5
5 -
 6
6 -
 7
7 -
 8
8
 |
 |
