Homelite UT13126 User Manual - Page 10
Assembly, Operation - lawn mower
 |
View all Homelite UT13126 manuals
Add to My Manuals
Save this manual to your list of manuals |
Page 10 highlights
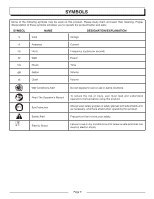
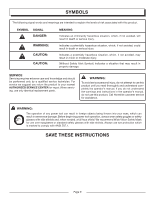
ASSEMBLY INSTALLING THE GRASS CATCHER See Figure 5. NOTE: When using the grass catcher, do not install either the side discharge deflector or the mulching plug. Lift the rear discharge door. Lift the grass catcher by its handle and place under the rear discharge door so that the hooks on the grass catcher are seated on the door rod. Release the rear discharge door. When installed correctly, the hooks on the grass catcher will extend through the openings on the rear discharge door. SETTING BLADE HEIGHT See Figure 6. When shipped, the wheels on the mower are set to a low-cutting position. Before using the mower for the first time, raise the cutting position to the height best suited for your lawn. The average lawn should be between 1-1/2 in. to 2 in. during cool months and between 2 in. and 3-1/4 in. during hot months. To adjust the blade height: To raise the blade height, grasp the height adjustment lever and move it toward the back of the mower. To lower the blade height, grasp the height adjustment lever and move it toward the front of the mower. GRASS CATCHER HANDLE HOOKS REAR DISCHARGE DOOR OPENINGS DOOR ROD Fig. 5 HEIGHT ADJUSTMENT LEVER HIGHEST BLADE SETTING OPERATION LOWEST BLADE SETTING Fig. 6 WARNING: Do not allow familiarity with this type of product to make you careless. Remember that a careless fraction of a second is sufficient to inflict serious injury. WARNING: Always wear safety goggles or safety glasses with side shields when operating this product. Failure to do so could result in objects being thrown into your eyes, resulting in possible serious injury. WARNING: Do not use any attachments or accessories not recommended by the manufacturer of this product. The use of attachments or accessories not recommended can result in serious personal injury. APPLICATIONS You may use this product for the purpose listed below: Mowing your lawn Page 10
-
 1
1 -
2
-
3
-
4
-
 5
5 -
 6
6 -
 7
7 -
 8
8 -
 9
9 -
 10
10 -
 11
11 -
 12
12 -
 13
13 -
 14
14 -
 15
15 -
16
-
17
-
18
-
19
-
20
 |
 |
