Honeywell 2020-5 User Guide - Page 134
Image Scanner Report, Image Scanner Address, Base Address, Resetting the Standard Product Default
 |
View all Honeywell 2020-5 manuals
Add to My Manuals
Save this manual to your list of manuals |
Page 134 highlights
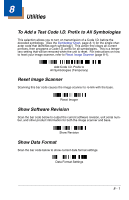
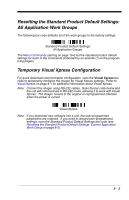
Image Scanner Report Scan the bar code below to generate a report for the connected image scanners. The report indicates the port, work group, image scanner name, and address. To assign a name to your image scanner, refer to "Menu Command Syntax" on page 10-1. Image Scanner Report Image Scanner Address Scan the bar code below to determine the address of the image scanner you are using. Image Scanner Address Base Address Scan the bar code below to determine the address of the base you are using. Base Address Resetting the Standard Product Default Settings: Current Application Work Group If you aren't sure what programming options are in your image scanner, or you've changed some options and want the standard product default settings restored, scan the Standard Product Default Settings: Current Application Group bar code below. The Menu Commands starting on page 10-6 list the factory default settings for each of the commands (indicated by an asterisk (*) on the programming pages). Note: Scanning this bar code also causes both the image scanner and the base to perform a reset and become unlinked. Refer to "Image Scanner Modes" on page 1-5 for additional information. Standard Product Default Settings: Current Application Group 8 - 2
-
 1
1 -
2
-
3
-
4
-
5
-
6
-
7
-
8
-
9
-
10
-
11
-
12
-
13
-
14
-
15
-
16
-
17
-
18
-
19
-
20
-
21
-
22
-
23
-
24
-
25
-
26
-
27
-
28
-
29
-
30
-
31
-
32
-
33
-
34
-
35
-
36
-
37
-
38
-
39
-
40
-
41
-
42
-
43
-
44
-
45
-
46
-
47
-
48
-
49
-
50
-
51
-
52
-
53
-
54
-
55
-
56
-
57
-
58
-
59
-
60
-
61
-
62
-
63
-
64
-
65
-
66
-
67
-
68
-
69
-
70
-
71
-
72
-
73
-
74
-
75
-
76
-
77
-
78
-
79
-
80
-
81
-
82
-
83
-
84
-
85
-
86
-
87
-
88
-
89
-
90
-
91
-
92
-
93
-
94
-
95
-
96
-
97
-
98
-
99
-
100
-
101
-
102
-
103
-
104
-
105
-
106
-
107
-
108
-
109
-
110
-
111
-
112
-
113
-
114
-
115
-
116
-
117
-
118
-
119
-
120
-
121
-
122
-
123
-
124
-
125
-
126
-
127
-
128
-
 129
129 -
 130
130 -
 131
131 -
 132
132 -
 133
133 -
 134
134 -
 135
135 -
 136
136 -
 137
137 -
 138
138 -
 139
139 -
140
-
141
-
142
-
143
-
144
-
145
-
146
-
147
-
148
-
149
-
150
-
151
-
152
-
153
-
154
-
155
-
156
-
157
-
158
-
159
-
160
-
161
-
162
-
163
-
164
-
165
-
166
-
167
-
168
-
169
-
170
-
171
-
172
-
173
-
174
-
175
-
176
-
177
-
178
-
179
-
180
-
181
-
182
-
183
-
184
-
185
-
186
-
187
-
188
-
189
-
190
-
191
-
192
 |
 |
