Honeywell CT40A Owner's Manual - Page 2
Remove Old Thermostat, Wire and Mount New Thermostat, Check Out Thermostat
 |
View all Honeywell CT40A manuals
Add to My Manuals
Save this manual to your list of manuals |
Page 2 highlights
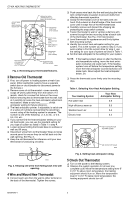
.8 .8 .3 .3 CT40A HEATING THERMOSTAT ADJUSTABLE HEAT ANTICIPATOR INDICATOR MOUNTING HOLE (THERMOSTAT TO WALL OR OUTLET BOX) .1 .4 .6 MOUNTING POSTS (4) (FOR COVER) ADJUSTABLE HEAT ANTICIPATOR SCALE SNAP SWITCH CONTACTS MOUNTING CLIPS (2) (FOR COVER) MOUNTING HOLE (THERMOSTAT TO WALL OR OUTLET BOX) TEMPERATURE SETTING LEVER M8453 Fig. 2. Reviewing your thermostat features. 3 Remove Old Thermostat ❑ First, turn off power to heating system at main fuse panel. (Most residential systems have a separate switch box or circuit breaker to disconnect power to the furnace.) ❑ Remove cover of old thermostat-cover normally snaps off when pulled firmly from the bottom. If it resists, check for a screw that locks on the cover. ❑ Before removing the old thermostat from the wall, look at it carefully to locate the heat anticipator adjustment mechanism. Make a note here_______ of that anticipator setting for future reference. ❑ The heat anticipator pointer, if adjustable, is set at one of a series of numbers representing the (electrical) current rating of the heating system in amperes. The number is one of the following: .2,.4,.8, etc., or 0.2, 0.4, 0.8, etc. ❑ If you cannot find the heat anticipator setting on your old thermostat, you can use the standard setting for your type of system as listed in Table 1 in step 4. ❑ Loosen screws holding thermostat base to subbase or wall and lift away. ❑ Disconnect wires from old thermostat. Wrap old wires around pencil to ensure they do not fall back into the wall opening. See Fig. 3. ❑ Keep the old thermostat for reference until your new thermostat is functioning smoothly. ❑ Push excess wire back into the wall and plug the hole with nonflammable insulation to prevent drafts from affecting thermostat operation. ❑ Grasp the thermostat cover at the sides with one hand. Pull outward on the left edge of the thermostat cover until it snaps free of the thermostat base. ❑ Carefully remove and discard the shipping tab protecting the snap switch contacts. ❑ Fasten thermostat to wall or vertical outlet box with screws through the two mounting holes at each side of the thermostat. See Fig. 2 for hole location. ❑ Level thermostat for appearance and firmly tighten both mounting screws. ❑ Identify the correct heat anticipator setting for your system. This is the number you noted in step 3. If you were unable to find the current draw for step 3, use the setting for your type of system as listed in Table 1. ❑ Set the heat anticipator to the setting for your system. NOTE: If the heating system stays on after the thermostat temperature setting, move the heat anticipator clockwise one scale mark. If the heating system turns off before the temperature setting, move the heat anticipator counterclockwise one scale mark. Never adjust the heat anticipator below .3A. ❑ Press the thermostat cover firmly onto the mounting clips. Table 1. Selecting Your Heat Anticipator Setting. Your Heating System Your Heat Anticipator Setting Hot water heat 0.8 High efficiency warm air 0.8 Standard warm air 0.4 Electric heat 0.3 .1 .4 .6 HEAT ANTICIPATOR SETTING LEVER ANTICIPATOR SCALE M8452 M8451 Fig. 3. Keeping old wires from falling back into wall opening. 4 Wire and Mount New Thermostat ❑ Connect each wire from the wall to either terminal on the back of the thermostat. Tighten the screws. Fig. 4. Setting heat anticipator rating. 5 Check Out Thermostat ❑ Turn on the power to the heating system. ❑ Observe the system operation for at least one complete cycle. Move the temperature setting lever 6° C (10° F) above room temperature; the heating equipment should turn on. Move the temperature lever 6° C (10° F) below room temperature; the heating equipment should turn off. 69-0847B-1 2
-
 1
1 -
 2
2 -
 3
3 -
 4
4 -
 5
5 -
 6
6 -
 7
7 -
 8
8
 |
 |
