Honeywell HWM330 Owners Manual - Page 4
Season Care And Storage - humidifiers
 |
UPC - 092926343125
View all Honeywell HWM330 manuals
Add to My Manuals
Save this manual to your list of manuals |
Page 4 highlights
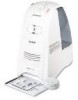
WALL QuickSteam_OM_04-25-06.qxd 4/25/06 4:53 PM Page 4 Set-Up NOTE: We recommend that the humidifier be disinfected prior to first use. Please see CLEANING INSTRUCTIONS. Select a firm, level, flat location - at least six inches (15 cm) from any wall or object for proper air flow (Fig. 1). Place the humidifier on a water-resistant surface, as water can damage furniture and some flooring. Kaz will not accept responsibility for property damage caused by water spillage. • Remove the Water Tank by grasping handle and pulling straight up (Fig. 1). Set aside. • Remove the Power Unit by grasping it and lightly tilting forward while pulling up. You will feel the unit disengage from its lock (Fig. 2). Set the Power Unit aside. • Remove the Water Tray (Fig. 3). Set the Water Tray aside. • Place one Mineral Absorption Pad flat on the Heating Plate. See the MINERAL ABSORPTION PAD section (page 5) for more information. • Replace the Water Tray. • Replace the Power Unit, making sure it is installed properly. Align the back of the Power Unit directly behind the tabs of the Base and press down firmly. You will hear a slight click. Your Power Unit will be flush with the Base (Fig. 4). • Fill the Water Tank with cool tap water (Fig. 5). See the FILLING section (page 5) for more information. NOTE: Save your box for end of season storage. (See END OF SEASON CARE AND STORAGE section.) Fig. 1 Fig. 2 Base Fig. 3 6" Power Unit Removable Water Tray Base Fig. 4 4
-
 1
1 -
 2
2 -
 3
3 -
 4
4 -
 5
5 -
 6
6 -
 7
7 -
 8
8 -
 9
9 -
 10
10 -
11
-
12
-
13
-
14
-
15
-
16
-
17
-
18
-
19
-
20
-
21
-
22
-
23
-
24
-
25
-
26
-
27
-
28
-
29
-
30
-
31
-
32
-
33
-
34
-
35
-
36
-
37
-
38
-
39
-
40
-
41
-
42
-
43
-
44
 |
 |
