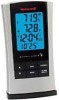
Honeywell TE219ELW User Manual - Page 8
Manual Settings, Clock Alarms - wireless in out thermometer
 |
UPC - 843616002378
View all Honeywell TE219ELW manuals
Add to My Manuals
Save this manual to your list of manuals |
Page 8 highlights
MANUAL SETTINGS It is necessary to set the desired US TIME ZONE. TIME ZONE • Press MODE button once so that the Day of the Week abbreviation is displayed to the right of the time; for example: pm 2:37tu • Select the Time Zone by pressing and holding UP ( ▲) button for 3 seconds • Keep holding UP ( ▲) button until the desired US Time Zone (Pacific, Mountain, Central or Eastern) is highlighted on the display's US map, located to the right of the time display and above the day of the week • Release the UP (▲) button. The Time Zone is set CLOCK • Press and hold MODE button for 3 seconds: the year will flash. Press UP (▲) or DOWN (▼) to change flashing digits. • After the year is set, press MODE button to confirm and move to the next parameter (month) • Continue setting month, date, hour, minutes, language for the day of the week and temperature in Fahrenheit or Celsius • Press MODE for the last time to return to the time of day with seconds, after the last parameter is set CLOCK ALARMS The Wireless In/Out Thermometer has two time alarms - Weekday alarm (W) and Single day alarm(S) - and one Ice Warning Alarm (PRE-AL). • If Weekday (W) alarm is activated, it will sound at the set time and the alarm icon will flash Mondays through Fridays • If Single (S) day alarm is activated, it will sound at the set time and the alarm icon will flash only for this specific day and will not activate on 15 subsequent days • If Ice Warning Alarm ( PRE-AL) is activated, in will sound at the set time and alarm icon will flash once the remote temperature for Channel One (1) will reach 32°F(0°C) and below NOTE: Ice Warning Alarm can be set only if one or both - Weekday or Single alarm - are programmed. SETTING THE WEEKDAY (W) AND SINGLE DAY (S) ALARMS • Press ALARM button once to enter into the alarms setting mode. The default alarm is a Weekday alarm (W). The abbreviation "OFF" with a letter "W" next to it will be displayed, if the alarm has not been set previously • Press and hold ALARM button for two seconds. The hour digit will flash • Adjust the hour using UP ( ▲) or DOWN ( ▼) buttons • Press ALARM button again. The minute digits will flash • Adjust the minutes using UP (▲) or DOWN (▼) buttons • Press ALARM button again to confirm and the weekday alarm time will be set • Set Single (S) day alarm if desired in the same manner SETTING THE ICE WARNING ALARM (PRE-AL) If Weekday (W) or Single day (S) alarm is set, the Ice Warning Alarm (Pre-AL) can be programmed. • Press ALARM button once to enter into the Ice Warning Alarm setting mode. The abbreviation OFF with a PRE-AL next to it will be displayed. • Press and hold ALARM button for two seconds. The number 30 will flash, meaning that if selected, the alarm will sound 30 minutes earlier 15 16
-
 1
1 -
2
-
 3
3 -
 4
4 -
 5
5 -
 6
6 -
 7
7 -
 8
8 -
 9
9 -
 10
10 -
 11
11 -
 12
12
 |
 |