Hoover F5914 Manual - Page 12
Using the tools, Cleaning bare floors - steamvac parts
 |
UPC - 073502025550
View all Hoover F5914 manuals
Add to My Manuals
Save this manual to your list of manuals |
Page 12 highlights
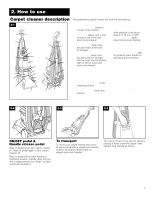
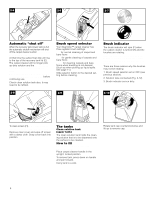
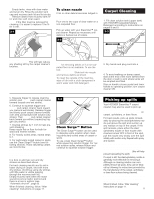
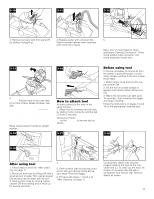
Cleaning bare floors How to attach bare floor attachment Disconnect carpet cleaner from electrical outlet. To prevent possible leaking, remove clean solution tank and recovery tank before positioning bare attachment. Refer to Fig. 2-9 to remove clean solution tank. Set tank aside (do not set tank on furniture). Refer to Fig. 2-16 to remove recovery tank. With handle in upright position, tilt cleaner back so that handle rests on the floor. 3-5 A B With foam strip (A) (located under the netting) in position as shown, place attachment on front of nozzle (B). Make sure arrow on end of attachment points in the direction as shown. RBAROETA RBAROETA TEFLOOR ON TEFLOOR ON 3-6 Push attachment against nozzle while rotating attachment downward until both ends snap into place. (Note: Some force may be required to rotate and snap attachment into place.) Return carpet cleaner to upright position. Lower handle and replace recovery tank. Raise handle to upright position and reposition clean solution tank. To clean floor Read Before you begin cleaning instructions on page 10. Do not use the SteamVac carpet cleaner on hardwood floors. Fill clean solution tank with HOOVER Hard Floor Cleaning Solution (available at additional cost if not included with your model) according to instructions on pages 8 and 9. Do not use any type of wax with your SteamVac™ carpet cleaner. R BOARTEAFLTOOERON Move speed selector to the Lo or Hl position for scrubbing or OFF if scrubbing is not desired. Dry hands and plug carpet cleaner into a properly grounded outlet. Step on handle release pedal and lower handle to operating position; turn carpet cleaner ON. To release solution, press trigger. Slowly move carpet cleaner forward and backward over area to be cleaned. To pick up dirty solution, release trigger and slowly move carpet cleaner over area where solution has just been dispersed. Use both forward and reverse strokes. Empty recovery tank when the motor sound becomes higher pitched and there is a loss in suction (see "Automatic shut-off", page 8). When finished cleaning, follow "After cleaning" instructions on page 11. Remove attachment from nozzle and rinse in clear water. Do not remove plastic screen or foam from attachment. Using the tools 3-7 B A How to attach hose 3-9 Disconnect carpet cleaner from elec- trical outlet. 3-8 D C E A. Powered hand tool has rotating brushes for extra scrubbing action on small carpet areas, carpeted stairs and upholstery. B. Stair/upholstery nozzle has a built-in brush to help provide the scrubbing action some spots may need for removal. C. Utility nozzle (not included with all models) can be used for carpet and upholstery in vehicles. 1. To prevent possible leaking, remove clean solution tank by pressing down on tank handle (D) and pulling forward; set tank aside (do not set tank on furniture). Remove hose from storage rack. 2. Step on handle release pedal (E) and lower carpet cleaner handle until it rests on the floor. Unlatch back part of recovery tank and remove lid. 12
-
 1
1 -
2
-
3
-
4
-
5
-
6
-
 7
7 -
 8
8 -
 9
9 -
 10
10 -
 11
11 -
 12
12 -
 13
13 -
 14
14 -
 15
15 -
 16
16 -
 17
17 -
18
-
19
-
20
-
21
-
22
-
23
-
24
-
25
-
26
-
27
-
28
-
29
-
30
-
31
-
32
-
33
-
34
-
35
-
36
-
37
-
38
-
39
-
40
 |
 |
