Hoover F6207-900 Owners Manual - Page 12
Maintenance
 |
UPC - 073502028520
View all Hoover F6207-900 manuals
Add to My Manuals
Save this manual to your list of manuals |
Page 12 highlights
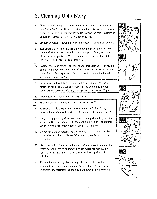
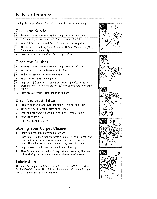
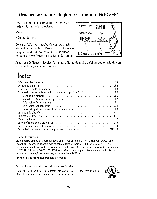
6. Maintenance Unplug the carpet cleaner frmn electrical outlet before servicing, Clean the Nozzle p Remove solution and recovery tanks to prevent possible leaks. _i k . 2,. l..if'tup on top of' nozzle {A)and slide off cleaner, Fig_ 6,t 3, Wipe debris off nozzle and front of cleaner with a damp cloth° p Tilt cleaner back, raising front of cleaner off floor. Slide nozzle (B] up from bottom of cleaner, Fig, 6.2 5, P_'ess on upper portion of nozzle to snap in place., A" L Clean the Brushes ['_, Remove solution and recovery tanks to prevent possible leaks. Z Tilt cleaner back so handle rests on the floor, -3o Pull brush assembly firmly to remove, Fig,,6,3 4, Rinse brushes under running water, brushes slightly to align square post (E) with square hote (F) in cleaner. _, AFilgig. n6,p4osts (Q on brush assembly with slots (D) in cleaner. Turn 6. Press brush assembly firmly and snap in place_ Clean the Brush Filter 1. Remove solution and recovery tanks to prevent possible leaks. Tilt cleaner back so handle rests on the floor: 3., Squeeze Filter Frame (G) and pull it out until it stops. Fig, 6°5 4. Wipe debris off filter. 5, Slide filter back into place, Storing Your Carpet Cleaner Empty solution tank and rinse thoroughly., 2. Place empty solution tank on carpet cleaner, Turn carpet cleaner ON. Squeeze trigger and push carpet cleaner forward and back several times, This will clear any solution remaining inside the cleaner, 7. Empty recovery tank, rinse thoroughly and let air dry. 4o Allow brashes and underside of carpet cleaner to air dr_ thoroughly before storing carpet cleaner on a carpeted or wood surface. Lubrication The motor is equipped with bearings which contain sufficient lubrication for the life of the motor, The addition of lubricant could cause damage. Do not add lubricant to motor bearings,, DF E 6 12
-
 1
1 -
2
-
3
-
4
-
5
-
6
-
 7
7 -
 8
8 -
 9
9 -
 10
10 -
 11
11 -
 12
12 -
 13
13 -
 14
14 -
 15
15 -
 16
16 -
 17
17 -
18
-
19
-
20
-
21
-
22
-
23
-
24
-
25
-
26
-
27
-
28
-
29
-
30
-
31
 |
 |