Hoover U5265-900 Manual - Page 8
Filter assembly
 |
View all Hoover U5265-900 manuals
Add to My Manuals
Save this manual to your list of manuals |
Page 8 highlights
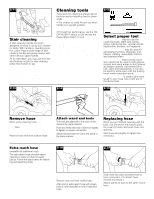
Filter assembly The HEPA filter and pre-filter screen are essentially self-shedding. Tapping the side of the dirt cup as described in "How to empty dirt cup" should sufficiently remove dust and fine particles from the HEPA filter and pre-filter. The filter assembly can also be removed for additional cleaning. 3-5 H How to clean filter assembly Remove dirt cup and dirt cup lid as described in "How to empty dirt cup". Grasp pre-filter frame (H) and pull up firmly. Slide filter assembly out of cup. 3-6 Grasp end of cartridge filter and gently pull it away from pre-filter. Remove cartridge from assembly. The pre-filter can be cleaned with a brush and then rinsed with water. Allow pre-filter to dry thoroughly. 3-7 RIGHT WRONG 3-8 3-9 I J It is recommended that the HEPA cartridge filter be cleaned by tapping either of the ends until no more dust particles fall from the filter. DO NOT tap the soft, pleated sides of the filter. It could damage the filter. Do not rinse or wash the filter. To re-assemble the filter assembly, place large knob of cartridge filter in hole on bottom of pre-filter. Snap top of cartridge filter into place. Align grooves (I) on pre-filter frame with ribs (J) in dirt cup. 3-10 3-11 3-12 K Slide filter assemby down into cup until a light snap is felt. Gently pull up on assembly to ensure that it is seated properly in the cup. Ensure that no part of pre-filter screen extends above top edge of dirt cup. Replace lid and return cup to cleaner (Fig. 3-4). Cleaning final filter The final filter assists in returning clean air to the room. Using a screwdriver, remove the two screws as shown and lift off lens. Lift out filter (K) and hand wash in cold water with a mild detergent. Let filter air dry then reposition. Replace lens and screws. Should you want to replace this filter, ask for HOOVER part no. 38765024 (filter package part no. 40110004). Do not operate cleaner without any of the filters in place. 8
-
 1
1 -
2
-
 3
3 -
 4
4 -
 5
5 -
 6
6 -
 7
7 -
 8
8 -
 9
9 -
 10
10 -
 11
11 -
 12
12
 |
 |
