Hoover U64019RM Product Manual - Page 5
llOSD5513
 |
View all Hoover U64019RM manuals
Add to My Manuals
Save this manual to your list of manuals |
Page 5 highlights
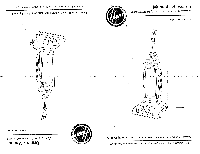
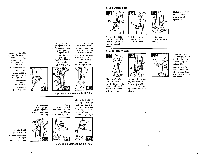
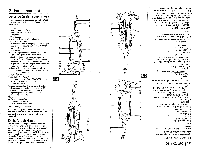
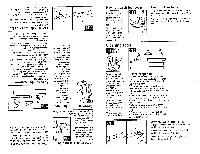
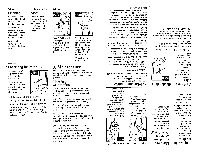
STEP II Attach hose NOTE: Hose must be connected as shown for all operations. 'SOpOSSDDC ap edell e[ 311315 & 0110SDDD8 [D .1850105 e EAISCIA •eslog el 3433s3p cnuaitueu3Detule 3p CD.T pp 0110SDDDC tS Sipa •LL9IDDS10ld ns end onse[d ap espq sun us opeiecitu3 SUSIA opeuoi33coyn; OLLOW 3p opos333e 1a .sollOSD5513 3p ede; el elqv .s3uope.ndo set sego; end el;s3ntu DS OWOS EpEPSUOD 18133 acpp ennEueto e1 :eloN .e.topelidse et DP Lop3;sod aped ei t.43 lolualLueu3Deulle 3p ED4 p us (0 satcpniu end eitinboq e[ lc (I) sempipu3LI elect OpOSS3D8 p 'L-i) oAlod end 8111310553 et *Dug .oqn; oLlo p 1105 cquanuipaDold p eltd3H •Lop3dns aped el u3 p us °gni p alma -3podos pp Lop3jui aped el u3 oupnbad 5911.1 011DWVIP UOD oqn; pp mama p anbotop 8'`L soposame soi Je3O[O3 Wed III OSVd •(O) elanGuetu e.[ op oqn; pp liquap 3podos p 31cLos elanBuetu el anboloj %Lan' ns u3 efij 3p3nb 3nb end ennBLietu e[ 345 (ta) LLD e.pnBuetu 13i 3511saO II/ .o6Lieto pp iopalsod aped 81 US `cmod p end opripu.o3 p ua (d) seinuel set 3.1cios (a) uol333Rold et UOD el3nBuetu e[ DP OLUDAIX3 to SDUHV Ilj 3 9' wan6uetu el Jepawn eJed II OSVd Align end of hose with projection (0) over slots (F) in dirt duct on back of handle. Slide hose into (F) and twist hose to lock it into place. STEP III Position tools Place smaller dial 1efer end of wand into bottom of rack. Snap wand into c ip at the top. Repeat with other wand. Snap dusting brush (H), crevice CO-GI (1) and furniture nozzle (.1) into storage area on back of cleaner. Position hose over rack and into hose tube (G). 1 '10 Open tool cover. The powered hand tool is shipped in a plastic bag for protection. Remove tool from storage area and discard bag. Reposition tool and close tool cover.
-
 1
1 -
 2
2 -
 3
3 -
 4
4 -
 5
5 -
 6
6 -
 7
7 -
 8
8 -
 9
9 -
 10
10 -
 11
11 -
12
-
13
-
14
-
15
-
16
-
17
-
18
-
19
-
20
 |
 |
