Hoover UH70070 Manual - Page 10
Powered hand tool
 |
View all Hoover UH70070 manuals
Add to My Manuals
Save this manual to your list of manuals |
Page 10 highlights
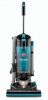
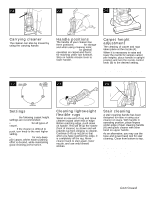
Powered hand tool Agitator brush roll replacement When agitator brushes are worn, the brush roll should be replaced. Ask for HOOVER part No. 48414088. 3-21 A 3-22 B 2. Unscrew the two Phillips screws and remove belt guard (B). How to replace 1. Remove tool from hose and turn it so bottom faces up. Press the latches on both sides of tool and remove bottom plate (A). 3-24 3-25 B 3-23 D C 3. Remove agitator including end plates (C) and discard. 4. Inspect belt to ensure that it is in good condition. If belt is cracked, gouged or broken, replace it (see following section). 5. Insert brush roll through belt and position belt over gear teeth (D) on brush roll. 3-26 A C E 6. With curved ends down, slide end plates (C) of brush roll into slots (E) on tool. Powered hand tool Belt replacement Inspect the belt The powered hand tool belt is designed to last a long time and is not normally replaced. However, if the belt is cracked, gouged or broken, it should be replaced. 3-27 Remove tool from hose. The belt can be seen through the top of the nozzle or by removing the bottom plate and belt guard (Figs. 3-21 and 3-22). 10 7. Replace belt guard (B) making sure not to pinch brush bristles in guard. Turn agitator, to make sure it rotates freely. Replace and tighten screws. Replace belt When replacing belt, ask for HOOVER part No. 38528037. 1. Remove tool from hose. Remove bottom plate, belt guard and brush roll as described in Figs. 3-21 through 3-23. 3-28 F E 2. Grasp turbine (E) and pull firmly to remove. 3. Remove belt from turbine pulley (F). Replace with new belt. 8. To replace bottom plate (A), insert the four tabs on edge of bottom plate into slots on front of tool. Pivot bottom plate down and snap closed. 3-29 H G 4. With flat sides of turbine retainers (G) pointing down, slide retainers into grooves (H) in tool housing and snap into place. 5. Replace brush roll, belt guard, and bottom plate as described in Figs. 3-23 through 3-26.
-
 1
1 -
2
-
3
-
4
-
 5
5 -
 6
6 -
 7
7 -
 8
8 -
 9
9 -
 10
10 -
 11
11 -
 12
12
 |
 |
