Hoover UH70905 Product Manual - Page 23
Important, Warning, Caution
 |
View all Hoover UH70905 manuals
Add to My Manuals
Save this manual to your list of manuals |
Page 23 highlights
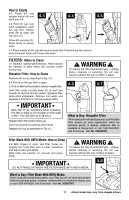
Carbon Filter : How to Clean (Available on select models only). Your Carbon Filter is located on the underside of the Filter made with HEPA media. IMPORTANT DO NOT RINSE OR WASH the Carbon Filter. What to Buy: Carbon Filter Carbon Filter may need to be replaced more often to maintain optimal odor absorbing effectiveness. Additional filter is available at Hoover.com or call 1-800-944-9200. Ask for Hoover® Part 902404001. . Cyclonic Filter Assembly: How to Clean ! WARNING ! To reduce the risk of personal injury - Unplug before cleaning or servicing. Do not use vacuum without dirt cup or filters in place. Remove dirt cup as described in Fig. 4.3. 4.9 Twist filter assembly (B) counter-clockwise. Remove assembly from dirt cup (A). 4.10 Dirt and debris can be cleaned from the filter assembly with the Dusting/ Upholstery Tool. Place the filter assembly (4.9, B) on the dirt cup, aligning (3) tabs on filter with (3) slots on dirt cup (A) and twist it clockwise to secure into position. Replace dirt cup as described in Fig. 4.5. 4.9 4.10 B A IMPORTANT Filter assembly must be properly aligned to dirt cup to function properly. BRUSHROLL: How to Clean ! CAUTION ! To reduce the risk of injury from moving parts Unplug before servicing. 4.11 A 4.12 4.11 Turn vacuum over so bottom side is facing up and remove the (6) screws (A). 4.12 Pivot out bottom plate away from hidden latch B (B) and remove any debris and/or hair from the brushroll. 4.13 A 4.13 Reposition bottom plate, aligning latch (B) and fastening all (6) screws (A). Press firmly at latch (B) area to ensure that it is properly latched. B Actual model may vary from images shown. 12
-
 1
1 -
2
-
3
-
4
-
5
-
6
-
7
-
8
-
9
-
10
-
11
-
12
-
13
-
14
-
15
-
16
-
17
-
 18
18 -
 19
19 -
 20
20 -
 21
21 -
 22
22 -
 23
23 -
 24
24 -
 25
25 -
 26
26 -
 27
27 -
 28
28 -
29
-
30
-
31
-
32
-
33
-
34
-
35
-
36
-
37
-
38
-
39
-
40
-
41
-
42
-
43
-
44
-
45
-
46
-
47
-
48
-
49
-
50
-
51
-
52
-
53
-
54
-
55
-
56
 |
 |
