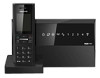
Huawei HG536a Quick Start Guide - Page 5
Setting the Internet Access Parameters
 |
View all Huawei HG536a manuals
Add to My Manuals
Save this manual to your list of manuals |
Page 5 highlights
3 Setting the Internet Access Parameters To set the Internet access parameters, do as follows: Step 1 Set the network connection of your computer and ensure that your computer obtains an IP address automatically. By default, the DHCP function of the HG536a is enabled. In this case, the HG536a assigns an IP address to your computer automatically and you do not need to configure the IP address of your computer. Step 2 Log in to the Web-based configuration utility of the HG536a. 1. Launch the Internet Explorer on your computer. Enter http://192.168.1.1 in the address bar, and then press Enter. 2. In the displayed dialog box, enter the user name (admin by default) and the password (admin by default), and then click Login. After the user name and the password are verified, you can access the Web-based configuration utility. Step 3 Enable the embedded dial-up function. 1. In the navigation tree on the left, choose Basic > WAN. 2. Click New to create a WAN connection. 3. Select DSL from the Link Type option button. 4. Select Enable for WAN connection. 5. Enter the VPI and VCI parameters that are provided by the network operator in the VPI/VCI text boxes. 6. Select INTERNET from the Service list option button. 7. Select PPP(oE) from the Connection type drop-down combo box. 8. Enter the user name and password that are provided by the network operator in the User name and Password text boxes, keep the default settings of other parameters. 9. Click Submit. After you complete the preceding settings, you can surf the Internet. You need to perform the preceding operations on a computer once only. The next time when you power on your computer, you can surf the Internet without any configuration. 5
-
 1
1 -
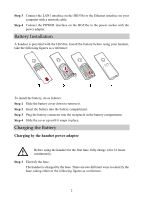 2
2 -
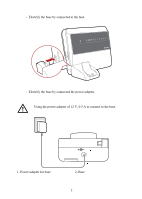 3
3 -
 4
4 -
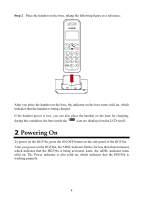
 5
5 -
 6
6 -
 7
7 -
 8
8
 |
 |
