Hunter 21617 Owner's Manual
Hunter 21617 Manual
 |
View all Hunter 21617 manuals
Add to My Manuals
Save this manual to your list of manuals |
Hunter 21617 manual content summary:
- Hunter 21617 | Owner's Manual - Page 1
For Your Records and Warranty Assistance Model Name Catalog/Model No Serial No Date Purchased Where Purchased For reference also attach your receipt or a copy of your receipt to the manual. installation and operation manual for Hunter Ceiling Fans TYPE 3 Models 42700-01 • 01/15/08 - Hunter 21617 | Owner's Manual - Page 2
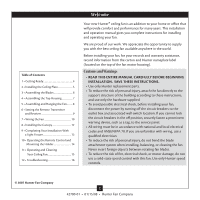
and Cleaning Your Ceiling Fan 15 12 • Troubleshooting 16 Welcome Your new Hunter® ceiling fan is an addition to your home or office that will provide comfort and performance for many years. This installation and operation manual gives you complete instructions for installing and operating - Hunter 21617 | Owner's Manual - Page 3
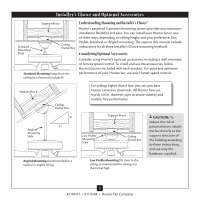
, including a wall-mounted or remote speed control. To install and use the accessories, follow the instructions included with each product. For quiet and optimum performance of your Hunter fan, use only Hunter speed controls. Support Brace Ceiling Outlet Box For ceilings higher than 8 feet, you - Hunter 21617 | Owner's Manual - Page 4
missing or damaged, contact your Hunter dealer or call Hunter Technical Support Department at 888-830-1326. Preparing the Fan Site Before you begin installing the fan, follow all the instructions in the pullout sheet called "Preparing the Fan Site." Proper ceiling fan location and attachment to the - Hunter 21617 | Owner's Manual - Page 5
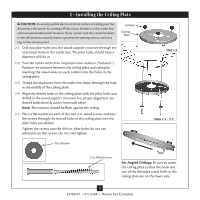
pilot holes into the wood support structure through the outermost holes in the outlet box. The pilot holes should have a diameter of 9/64 in. 2-2. Your fan comes with three neoprene noise isolators ("Isolators"). Position the isolators between the ceiling plate and ceiling by inserting the raised - Hunter 21617 | Owner's Manual - Page 6
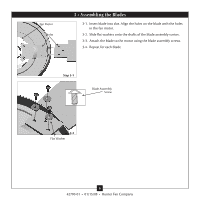
Holes 3 • Assembling the Blades 3-1. Insert blade into slot. Align the holes on the blade with the holes in the fan motor. 3-2. Slide flat washers onto the shafts of the blade assembly screws. 3-3. Attach the blade to the motor using the blade assembly screws. 3-4. Repeat for - Hunter 21617 | Owner's Manual - Page 7
sits flat on the adapter. 4-2. Install three (3) assembly screws and tighten them securely. Steps 4-1 - 4-2 Assembly Screw Top Housing Hanger Adapter 7 42700-01 • 01/15/08 • Hunter Fan Company - Hunter 21617 | Owner's Manual - Page 8
of the canopy and the two grooves in the hanger ball. 5-6. Raise the fan and place the hook on the ceiling plate through the round hole in the rim. WARNING: Fan may fall if not assembled as directed in these installation instructions. Round Hole 8 42700-01 • 01/15/08 • Hunter Fan Company - Hunter 21617 | Owner's Manual - Page 9
not function. 6-2. Install the included 12-volt battery into the transmitter. CAUTION: The remote control device complies with part 15 of the FCC rules. Changes or modifications not expressly approved by Hunter Fan Company could void your authority to operate this equipment. Operation is subject to - Hunter 21617 | Owner's Manual - Page 10
the ceiling plate. fan to the red wire from the receiver. • Connect the black wire with a white stripe from the fan to the black wire with a white stripe from the receiver. • Connect the white wire from the fan to the white wire (LIGHT OUT) from the receiver. 10 42700-01 • 01/15/08 • Hunter Fan - Hunter 21617 | Owner's Manual - Page 11
plate and the downrod to the ground wire from the ceiling. 7-9. Push all wires and wire connectors back through the ceiling plate hole into the outlet box. Place the green and white wires on a separate side of the outlet box from the other wires. 11 42700-01 • 01/15/08 • Hunter Fan Company - Hunter 21617 | Owner's Manual - Page 12
8-1- 8-3 8 • Installing the Canopy 8-1. Holding the canopy, raise the fan off the hook. 8-2. Align the holes in the canopy with the mounting holes on the ceiling plate. 8-3. Insert and tighten the mounting screws securely. Canopy Mounting Screw 12 42700-01 • 01/15/08 • Hunter Fan Company - Hunter 21617 | Owner's Manual - Page 13
light kit mounting plate. Securely tighten all three screws. 9-5. Connect the 2-pin plug connector from the fan to the 2-pin plug connector from the ballast. 9-6. Attach the ballast to the light kit fitter with Trim Band Step 9-9 Ballast Glass Globe 13 42700-01 • 01/15/08 • Hunter Fan Company - Hunter 21617 | Owner's Manual - Page 14
Steps 10-1 - 10-5 10-1. The remote transmitter has individual buttons for turning the fan off and on and controlling the light and fan speed. 10-2. For best operation, start the fan by pressing high, then select your desired speed. Fan Speed Medium Fan Off Fan Light 10-3. The reversing switch - Hunter 21617 | Owner's Manual - Page 15
remote control will not be used for 5 days or more, turn the wall switch OFF. 11-3. Ceiling fans the fan draw air upward (clockwise blade rotation) will distribute the warmer air trapped at the ceiling around -gloss blades in the same manner as the fan finish. In warm weather, use downward air flow - Hunter 21617 | Owner's Manual - Page 16
. 3. Be sure that the glass is secure. Problem: Excessive wobbling. 1. If your fan wobbles when operating, use the enclosed balancing kit and instructions to balance the fan. 2. Tighten all blade and/or blade iron screws. 3. Turn power off, support fan very carefully, and check that the hanger ball
-
 1
1 -
 2
2 -
 3
3 -
 4
4 -
 5
5 -
 6
6 -
 7
7 -
8
-
9
-
10
-
11
-
12
-
13
-
14
-
15
-
16
 |
 |

For Your Records and Warranty
Assistance
Model Name: _____________________
Catalog/Model No.: ________________
Serial No.: ________________________
Date Purchased: ___________________
Where Purchased: _________________
For reference also attach your receipt or a
copy of your receipt to the manual.
TYPE 3 Models
installation and
operation manual
for Hunter
Ceiling Fans
42700-01 • 01/15/08