Hunter 23921 Owner's Manual - Page 8
Hunter Fan Company
 |
View all Hunter 23921 manuals
Add to My Manuals
Save this manual to your list of manuals |
Page 8 highlights
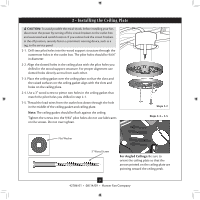
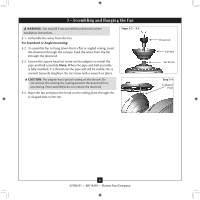
5 • Installing the Canopy 5-1. Partially install two canopy screws into the ceiling plate and one time. 5-2. Holding the canopy, raise the fan off the hook. 5-3. Align the slots in the canopy with the already partially installed canopy screws on the ceiling plate. 5-4. Raise the canopy over the ceiling plate. Rotate the canopy clockwise until the canopy screws on the ceiling plate totally engage with the slots in the canopy. 5-5. Install the third canopy screw into the canopy. Once all three screws are in, tighten them. 5-6. Lift the fan housing toward the ceiling and rotate the fan until each canopy tab engages a groove in the hanger ball. Note: If the tabs are already engaged, do not rotate. Step 5-2 Canopy Steps 5-4 - 5-5 Ceiling Plate Step 5-3 Ceiling Plate Canopy Screw Hanger Ball Canopy Screw 8 42786-01 • 08/14/09 • Hunter Fan Company
-
 1
1 -
2
-
 3
3 -
 4
4 -
 5
5 -
 6
6 -
 7
7 -
 8
8 -
 9
9 -
 10
10 -
 11
11 -
 12
12 -
 13
13 -
14
 |
 |
