Hunter 90391 Owners Manual - Page 7
Operation - Fan/remote, Remote Battery Installation, Fan Indicators
 |
View all Hunter 90391 manuals
Add to My Manuals
Save this manual to your list of manuals |
Page 7 highlights
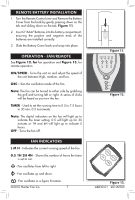
Remote Battery Installation 1. Turn the Remote Control over and Remove the Battery Cover from the back by gently pressing down on the tab and sliding down on the tab. Figure 11. 2. Insert 2 "AAA" Batteries into the battery compartment, ensuring the positive and negative ends of the batteries are installed correctly. 3. Slide the Battery Cover back and snap into place. Operation - Fan/remote See Figure 12. for fan operation and Figure 13. for remote operation. ON/SPEED - Turns the unit on and adjust the speed of the unit between High, medium, and low. OSC - Sets the oscillation mode of the fan. Note: The fan can be turned to either side by grabbing the grill and turning left or right. A series of clicks will be heard as you turn the fan. TIMER - Used to set the running time to 0.5 to 7.5 hours in 30 min, 0.5 increments. Note: The digital indicators on the fan will light up to indicate the timer setting. 0.5 will light up for 30 minutes or 1H and 4H will light up to indicate 5 hours. OFF - Turns the fan off. Fan Indicators L M H - Indicates the current running speed of the fan. 0.5 1H 2H 4H - Shows the number of hours the timer is set to run. - Fan oscillates from left to right. - Fan oscillates up and down. - Fan oscillates in a figure 8 motion. ©2010 Hunter Fan Co. 7 Figure 11. 0.5H 1H 2H 4H L MH ON l SPEED OSC TIMER OFF Figure 12. SPEED OSC ON/OFF TIMER Figure 13. 44830-01 20100903
-
 1
1 -
 2
2 -
 3
3 -
 4
4 -
 5
5 -
 6
6 -
 7
7 -
 8
8 -
 9
9 -
 10
10 -
 11
11
 |
 |
