Husqvarna 530iPT5 Owner Manual - Page 20
To adjust the depth gauge setting, To tension the chain, To sharpen the cutting teeth on,
 |
View all Husqvarna 530iPT5 manuals
Add to My Manuals
Save this manual to your list of manuals |
Page 20 highlights
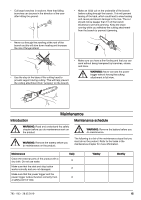
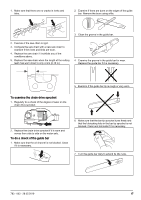
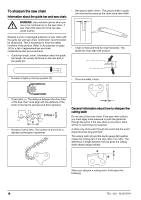
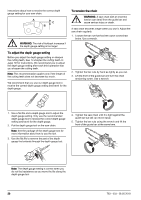
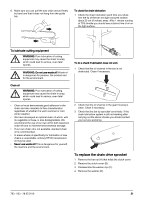
instructions about how to receive the correct depth gauge setting for your saw chain. A C B WARNING: The risk of kickback increases if the depth gauge setting is too large! To adjust the depth gauge setting Before you adjust the depth gauge setting or sharpen the cutting teeth, See To sharpen the cutting teeth on page 19, for instructions. We recommend you to adjust the depth gauge setting after each third operation that you sharpen the cutting teeth. Note: This recommendation applies only if the length of the cutting teeth does not decrease too much. We recommend that you use our depth gauge tool to receive the correct depth gauge setting and bevel for the depth gauge. To tension the chain WARNING: A saw chain with an incorrect tension can derail from the guide bar and cause serious injury or death. A saw chain becomes longer when you use it. Adjust the saw chain regularly. 1. Loosen the bar nut that hold the clutch cover/chain brake. Use a wrench. 2. Tighten the bar nuts by hand as tightly as you can. 3. Lift the front of the guide bar and turn the chain tensioning screw. Use a wrench. 1. Use a flat file and a depth gauge tool to adjust the depth gauge setting. Only use the recommended depth gauge tool to receive the correct depth gauge setting and bevel for the depth gauge. 2. Put the depth gauge tool on the saw chain. Note: See the package of the depth gauge tool for more information about how to use the tool. 3. Use the flat file to remove the part of the depth gauge that extends through the depth gauge tool. 4. Tighten the saw chain until it is tight against the guide bar but still can move easily. 5. Tighten the bar nuts using the wrench and lift the front of the guide bar at the same time. Note: The depth gauge setting is correct when you do not feel resistance as you move the file along the depth gauge tool. 20 783 - 003 - 28.05.2019
-
 1
1 -
2
-
3
-
4
-
5
-
6
-
7
-
8
-
9
-
10
-
11
-
12
-
13
-
14
-
 15
15 -
 16
16 -
 17
17 -
 18
18 -
 19
19 -
 20
20 -
 21
21 -
 22
22 -
 23
23 -
 24
24 -
 25
25 -
26
-
27
-
28
-
29
-
30
-
31
-
32
-
33
-
34
-
35
-
36
-
37
-
38
-
39
-
40
-
41
-
42
-
43
-
44
-
45
-
46
-
47
-
48
-
49
-
50
-
51
-
52
-
53
-
54
-
55
-
56
-
57
-
58
-
59
-
60
-
61
-
62
-
63
-
64
-
65
-
66
-
67
-
68
-
69
-
70
-
71
-
72
-
73
-
74
-
75
-
76
-
77
-
78
-
79
-
80
 |
 |
