Husqvarna AR19 Operation Manual - Page 9
Model AR25 Handle, CAUTION
 |
View all Husqvarna AR19 manuals
Add to My Manuals
Save this manual to your list of manuals |
Page 9 highlights
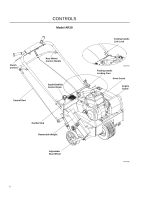
ASSEMBLY Model AR25 Handle 3. The aerator is shipped with the handle detached. Mount the handle using two ½" wrenches. a. Slide handle onto handle mounting brackets. b. Insert and tighten fasteners, which are located on handle mounting brackets. Attaching non-folding handle 4. Connect top of control rod to rear wheel control handle with fasteners located on rear wheel control handle using the upper hole on the control rod. 8060-034 Connect upper control rod 5. Connect bottom of control rod to OUTER side of lever on the torque arm through the lower hole, using the fastener assembly. CAUTION! Be certain that the clutch cable is properly routed. Connect lower control rod 8060-035 8060-036 9
-
 1
1 -
2
-
3
-
 4
4 -
 5
5 -
 6
6 -
 7
7 -
 8
8 -
 9
9 -
 10
10 -
 11
11 -
 12
12 -
 13
13 -
 14
14 -
15
-
16
-
17
-
18
-
19
-
20
-
21
-
22
-
23
-
24
-
25
-
26
-
27
-
28
 |
 |

9
ASSEMBLY
3.
The aerator is shipped with the handle detached.
Mount the handle using two ½" wrenches.
a.
Slide handle onto handle mounting brackets.
b.
Insert and tighten fasteners, which are located
on handle mounting brackets.
Model AR25 Handle
4.
Connect top of control rod to rear wheel control
handle with fasteners located on rear wheel control
handle using the upper hole on the control rod.
8060-034
Attaching non-folding handle
8060-035
Connect upper control rod
5.
Connect bottom of control rod to OUTER side of
lever on the torque arm through the lower hole,
using the fastener assembly.
8060-036
Connect lower control rod
CAUTION!
Be certain that the clutch cable is properly
routed.