Husqvarna HU700F Owners Manual - Page 14
Service And Adjustments - drive cable
 |
View all Husqvarna HU700F manuals
Add to My Manuals
Save this manual to your list of manuals |
Page 14 highlights
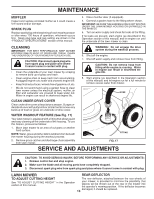
SERVICE AND ADJUSTMENTS TO REMOVE DRIVE BELT (See Fig. 18 & 19) 1. Remove drive cover and belt keeper. 2. Remove belt from gearcase pulley. 3. Turn lawn mower on its side with air filter and carbure- tor down. 4. Remove blade and blade adapter. DRIVE COVER TO ADJUST HANDLE (See Figs. 20-22) The handle can be mounted in a high or low position. The mounting holes in the bottom of lower handle are off center for raising or lowering the handle. 1. Remove upper handle and wire tie(s) securing cable(s) to lower handle. 2. Remove hairpin cotters from lower handle bracket mounting pin. 3. Squeeze lower handle in to remove it from mounting pins. 4. Turn lower handle over to raise or lower handle. 5. Squeeze lower handle in and position holes onto mounting pins on handle bracket. 6. Reassemble upper handle and all parts removed from lower handle. BELT GEARCASE PULEY SQUEEZE TO ADJUST LOWER HANDLE MOUNTING PIN HANDLE BRACKET HAIRPIN COTTER BLADE ADAPTER BLADE LOCK WASHER FIG. 18 KEY BELT KEEPER CRANKSHAFT KEYWAY BLADE HARDENED BOLT WASHER TRAILING EDGE BELT CRANKSHAFT RETAINER FIG. 19 TO REPLACE DRIVE BELT (See Fig. 20 & 21) 1. Place new drive belt on blade adapter pulley, inside tabs of belt retainer. 2. Route the other end of the new drive belt through hole in housing. 3. Reinstall blade. 4. Return mower to upright position. 5. Install new belt on gearcase pulley. 6. Reinstall belt keeper and drive cover. NOTE: Always use factory approved belt to assure proper fit and long life. 14 MOWING POSITION FIG. 20 MOWING POSITION HAIRPIN COTTER HANDLE BRACKET MOUNTING PIN LOW POSITION HIGH POSITION FIG. 21 LOWER HANDLE ROTATE FIG. 22
-
 1
1 -
2
-
3
-
4
-
5
-
6
-
7
-
8
-
 9
9 -
 10
10 -
 11
11 -
 12
12 -
 13
13 -
 14
14 -
 15
15 -
 16
16 -
 17
17 -
 18
18 -
 19
19 -
20
-
21
-
22
 |
 |
