Husqvarna MZ 52LE Owners Manual - Page 27
Adjusting the Mower Deck, Leveling deck, ZT-3100 Powertrain, Tire Pressures
 |
View all Husqvarna MZ 52LE manuals
Add to My Manuals
Save this manual to your list of manuals |
Page 27 highlights
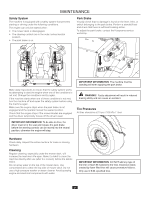
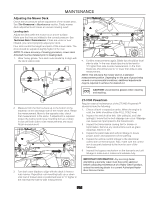
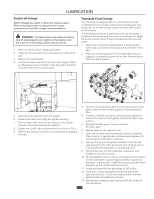
MAINTENANCE Adjusting the Mower Deck Check the tire pressure before adjustment of the mower deck. See Tire Pressures in Maintenance section. Faulty mower deck adjustments will cause an uneven mowing result. Leveling deck Adjust the deck while the mower is on a level surface. Make sure the tires are inflated to the correct pressure. See Technical Data / Transmission. If tires are under or over inflated, you cannot properly adjust your deck. Four slots control the height and pitch of the mower deck. The deck should be adjusted slightly higher in the rear. NOTE: To insure accuracy of leveling procedure, mower deck drive belt must be installed prior to leveling deck. 1. Wear heavy gloves. Turn each outer blade tip to align with the deck side-to-side. 4. Confirm measurements again. Blade tips should be level side-to-side. In the rear, blade tips should be level to 1/8" higher than side-to-side measurement. In the front, blade tips should be level to 1/8" lower than side-to-side measurement. NOTE: This will place the mower deck in a standard measurement position. Depending on the type of grass being mowed or environmental conditions, additional adjustments may be required to achieve the desired cut. CAUTION! Use protective glasses when cleaning and washing. 2. Measure from the floor surface up to the bottom of the blade tip on the discharge side of the mower deck. Retain this measurement. Move to the opposite side, check that measurement is the same. If adjustment is required, loosen the locknut and move mounting bolt up or down in slot until both side-to-side measurements are equal. Retain measurement. 3. Turn both outer blades to align with the deck in front-torear manner. Reposition rear mounting bolts up or down until rear of mower deck is positioned level to 1/8" higher in the rear than the side-to-side measurement. ZT-3100 Powertrain Regular external maintenance of the ZT-3400 Powertrain™ should include the following: 1. Check oil level in expansion tanks. When the engine is cold, the tanks should be at the FULL COLD level. 2. Inspect the vehicle drive belt, idler pulley(s), and idler spring(s). Insure that no belt slippage can occur. Slippage can cause low input speed to the transmission. 3. Inspect the transmission cooling fan for broken or bent blades. Remove any obstructions such as grass clippings, leaves or dirt. 4. Inspect the park brake and vehicle linkage to insure proper action and adjustment of the parking. 5. Inspect the vehicle control linkage to the directional control arm on the transaxle. Also, make sure the control arm is securely fastened to the trunnion arm of the transaxle. 6. Inspect the bypass mechanism on the transaxle and unit linkage to make sure it rotates and releases fully. IMPORTANT INFORMATION Any servicing dealer attempting a warranty repair must have prior approval before conducting maintenance of a Hydro-Gear® product, unless the servicing dealer is a current Authorized HydroGear Service Center. 27
-
 1
1 -
2
-
3
-
4
-
5
-
6
-
7
-
8
-
9
-
10
-
11
-
12
-
13
-
14
-
15
-
16
-
17
-
18
-
19
-
20
-
21
-
 22
22 -
 23
23 -
 24
24 -
 25
25 -
 26
26 -
 27
27 -
 28
28 -
 29
29 -
 30
30 -
 31
31 -
 32
32 -
33
-
34
-
35
-
36
-
37
-
38
-
39
-
40
-
41
-
42
-
43
-
44
 |
 |
