IBM 4810 32H Service Guide - Page 25
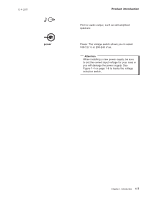
Attention
 |
View all IBM 4810 32H manuals
Add to My Manuals
Save this manual to your list of manuals |
Page 25 highlights
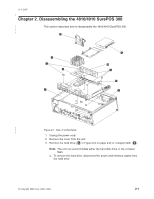
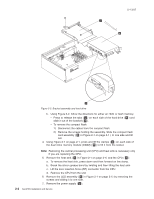
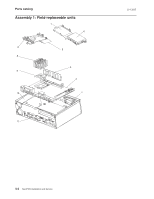
11-9-2005 | | | | | | a. Unplug the connector and remove the screws that hold the power supply. b. Lift the power supply from the unit. Attention When installing a new power supply, be sure to set the correct input voltage for your area or the power supply will be damaged. See Figure 1-3 on page 1-4 to locate the voltage selection switch. 8. Remove the screws holding the riser card and then remove riser card. | | Figure 2-3. Planar board assembly | 9. Using Figure 2-3 or Figure 2-1 on page 2-1, remove the screws ( L ) holding the planar board to the frame. 10. Remove the RS-232 panel-mounted connector ( M ). 11. You can now lift the planar board from the unit. | 12. To reassemble the 4810/4910 SurePOS 300, reverse this procedure. Note: For disassembling instructions for the SureMark printer and other I/O bundled with the 4910, please refer to each device's respective service guides. Chapter 2. Disassembling the 4810/4910 SurePOS 300 2-3
-
 1
1 -
2
-
3
-
4
-
5
-
6
-
7
-
8
-
9
-
10
-
11
-
12
-
13
-
14
-
15
-
16
-
17
-
18
-
19
-
 20
20 -
 21
21 -
 22
22 -
 23
23 -
 24
24 -
 25
25 -
 26
26 -
 27
27 -
 28
28 -
 29
29 -
 30
30 -
31
-
32
-
33
-
34
-
35
-
36
-
37
-
38
-
39
-
40
-
41
-
42
-
43
-
44
-
45
-
46
-
47
-
48
-
49
-
50
-
51
-
52
-
53
-
54
-
55
-
56
-
57
-
58
-
59
-
60
-
61
-
62
-
63
-
64
-
65
-
66
-
67
-
68
 |
 |
