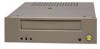
IBM 59P6746 User Guide - Page 15
Mounting the drive, Attaching the cables
 |
View all IBM 59P6746 manuals
Add to My Manuals
Save this manual to your list of manuals |
Page 15 highlights
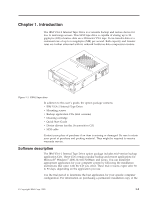
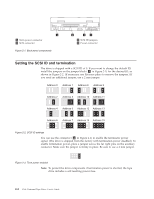
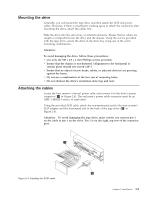
Mounting the drive Generally, you will mount the tape drive and then attach the SCSI and power cables. However, if there is insufficient working space to attach the connectors after mounting the drive, attach the cables first. Slide the drive into the server bay or external enclosure. Ensure that no cables are caught or crimped between the drive and the chassis. Using the screws provided with the tape drive, secure the drive in the drive bay using one of the screw mounting combinations. Attention: To avoid damaging the drive, follow these precautions: v Use only the M3 x 0.5 x 4 mm Phillips screws provided. v Ensure that the chassis is not distorted. (Alignment to the horizontal or vertical plane should not exceed ±10°.) v Ensure that no objects (screw heads, cables, or adjacent devices) are pressing against the frame. v Do not use a combination of the two sets of mounting holes. v Do not obstruct the drive's ventilation slots (top and rear). Attaching the cables Locate the host system's internal power cable and connect it to the drive's power connector ( 1 in Figure 2-4). The enclosure's power cable connector must be an AMP 1-480424-0 series, or equivalent. Using the provided SCSI cable, attach the non-terminated end to the host system's SCSI adapter and the terminated end to the back of the tape drive ( 2 in Figure 2-4). Attention: To avoid damaging the tape drive, make certain you connect pin 1 on the cable to pin 1 on the drive. Pin 1 is on the right, top row of the connector pins. Figure 2-4. Installing the SCSI cable Chapter 2. Installation 2-3
-
 1
1 -
2
-
3
-
4
-
5
-
6
-
7
-
8
-
9
-
 10
10 -
 11
11 -
 12
12 -
 13
13 -
 14
14 -
 15
15 -
 16
16 -
 17
17 -
 18
18 -
 19
19 -
 20
20 -
21
-
22
-
23
-
24
-
25
-
26
-
27
-
28
-
29
-
30
-
31
-
32
-
33
-
34
-
35
-
36
-
37
-
38
-
39
-
40
-
41
-
42
-
43
-
44
-
45
-
46
-
47
-
48
-
49
-
50
-
51
-
52
-
53
-
54
-
55
-
56
 |
 |
