IBM 59P6746 User Guide - Page 21
Setting write protection on the tape cartridge, Cleaning
 |
View all IBM 59P6746 manuals
Add to My Manuals
Save this manual to your list of manuals |
Page 21 highlights
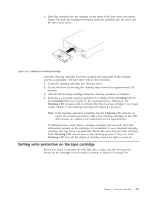
4. Slide the cartridge into the opening on the front of the tape drive (see figure Figure 3-2) until the loading mechanism pulls the cartridge into the drive and the drive door closes. Figure 3-2. Loading the cleaning cartridge After the cleaning cartridge has been inserted, the remainder of the cleaning process is automatic. The tape drive will do the following: 1. Loads the cleaning cartridge into the tape drive 2. Cleans the drive by moving the cleaning tape forward for approximately 30 seconds 3. Unloads the cleaning cartridge when the cleaning operation is complete 4. Indicates a successful cleaning operation by turning off the Cleaning LED (if the Cleaning LED was on prior to the cleaning process. Otherwise, the Cleaning LED remains solid to indicate that the cleaning cartridge is no longer usable. Obtain a new cleaning cartridge and repeat the process.) Note: If the cleaning operation completes but the Cleaning LED remains on, repeat the cleaning procedure with a new cleaning cartridge. If the LED still remains on, contact your authorized service representative. To determine how many times a cleaning cartridge may be used, check the information printed on the cartridge. If you attempt to use a depleted cleaning cartridge, the tape drive automatically detects the error and ejects the cartridge. If the Cleaning LED was on prior to the cleaning process, it stays on; if the Cleaning LED was off, the depleted cartridge causes the light to come on. Setting write protection on the tape cartridge Before you insert a cartridge into the tape drive, make sure the write-protect switch on the cartridge is set correctly, as shown in Figure 3-3 on page 3-6. Chapter 3. Using the tape drive 3-5
-
 1
1 -
2
-
3
-
4
-
5
-
6
-
7
-
8
-
9
-
10
-
11
-
12
-
13
-
14
-
15
-
 16
16 -
 17
17 -
 18
18 -
 19
19 -
 20
20 -
 21
21 -
 22
22 -
 23
23 -
 24
24 -
 25
25 -
 26
26 -
27
-
28
-
29
-
30
-
31
-
32
-
33
-
34
-
35
-
36
-
37
-
38
-
39
-
40
-
41
-
42
-
43
-
44
-
45
-
46
-
47
-
48
-
49
-
50
-
51
-
52
-
53
-
54
-
55
-
56
 |
 |
