IBM 8670 User Guide - Page 32
Using express configuration, Configuring the Ethernet controller
 |
View all IBM 8670 manuals
Add to My Manuals
Save this manual to your list of manuals |
Page 32 highlights
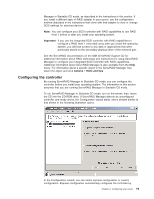
grouping the first two physical drives in the ServeRAID Manager tree into an array and creating a RAID level 1 logical drive. If you select custom configuration, you can select the two physical drives that you want to group into an array and create a hot-spare drive. Using express configuration Complete the following steps to use express configuration: 1. In the ServeRAID Manager tree, click the controller. 2. Click Express configuration. 3. Click Next. The "Configuration summary" window opens. 4. Review the information in the "Configuration summary" window. To change the configuration, click Modify arrays. 5. Click Apply; then, click Yes when asked if you want to apply the new configuration. The configuration is saved in the controller and in the physical drives. 6. Exit from ServeRAID Manager and remove the CD from the CD-ROM drive. 7. Restart the server. Using custom configuration Complete the following steps to use custom configuration: 1. In the ServeRAID Manager tree, click the controller. 2. Click Custom configuration. 3. Click Next. The "Create arrays" window opens. 4. From the list of ready drives, select the two drives that you want to group into the array. 5. Click (Add selected drives) to add the drives to the array. 6. Complete the following steps, if you want to configure a hot-spare drive: a. Click the Spares tab. b. Select the physical drive you want to designate as the hot-spare drive; then, click (Add selected drives). 7. Click Next. The "Configuration summary" window opens. 8. Review the information in the "Configuration summary" window. To change the configuration, click Back. 9. Click Apply; then, click Yes when asked if you want to apply the new configuration. The configuration is saved in the controller and in the physical drives. 10. Exit from ServeRAID Manager and remove the CD from the CD-ROM drive. 11. Restart the server. Configuring the Ethernet controller The Ethernet controller is integrated on the system board. It provides an interface for connecting to a 10-Mbps, 100-Mbps, or 1-Gbps network and provides full-duplex (FDX) capability, which enables simultaneous transmission and reception of data on the network. If the Ethernet ports in your server support auto-negotiation, the controller detects the data-transfer rate (10BASE-T, 100BASE-TX, or 1000BASE-T) and duplex mode (full-duplex or half-duplex) of the network and automatically operates at that rate and mode. You do not need to set any jumpers or configure the controller. However, you must install a device driver to enable the operating system to address the controller. For 20 IBM xSeries 345 Type 8670: User's Guide
-
 1
1 -
2
-
3
-
4
-
5
-
6
-
7
-
8
-
9
-
10
-
11
-
12
-
13
-
14
-
15
-
16
-
17
-
18
-
19
-
20
-
21
-
22
-
23
-
24
-
25
-
26
-
 27
27 -
 28
28 -
 29
29 -
 30
30 -
 31
31 -
 32
32 -
 33
33 -
 34
34 -
 35
35 -
 36
36 -
 37
37 -
38
-
39
-
40
-
41
-
42
-
43
-
44
-
45
-
46
-
47
-
48
-
49
-
50
-
51
-
52
-
53
-
54
-
55
-
56
-
57
-
58
-
59
-
60
 |
 |