Icom VE-PG4 Usb Driver Installation Guide - Page 4
Important
 |
View all Icom VE-PG4 manuals
Add to My Manuals
Save this manual to your list of manuals |
Page 4 highlights
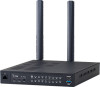
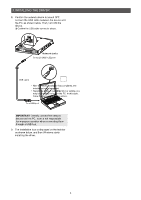
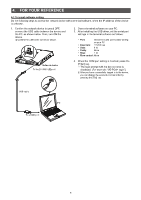
3. INSTALLING THE DRIVER 8. Confirm the network device is turned OFF, connect the USB cable between the device and the PC, as shown below. Then, turn ON the device. LLConfirm the USB cable connector shape. After the driver installation has completed, confirm the port connection and port number. 10. Click the folder icon on the taskbar. Click 11. Right-click "This PC," and then click "Properties." Network device To the [CONSOLE] port q Right-click USB cable PC To a USB port IMPORTANT: Directly connect the network device and the PC. Icom is not responsible for improper operation when connecting them through a USB hub. 9. The installation icon is displayed on the taskbar as shown below, and then Windows starts installing the driver. •• After the driver installation has completed, the installation icon disappears. •• Depending on your system version or setting, you may be prompted to restart the PC. In this case, follow the instructions on the screen. w Click 12. Click [Device Manager]. •• The "Device Manager" screen is displayed. Click 13. Double-click "Ports (COM & LPT)" on the "Device Manager" screen. Double-click •• When the driver is completely installed, "Silicon Labs CP210x USB to UART Bridge (COM)" is displayed. For example, the above screen shows the USB serial COM port number "3." •• The COM port number may differ, depending on the PC environment. •• If "!" or "×" is displayed on the "Device Manager" screen, the driver may not correctly be installed. In such a case, uninstall the USB driver first, and then reinstall it. 4
-
 1
1 -
 2
2 -
 3
3 -
 4
4 -
 5
5 -
 6
6 -
 7
7
 |
 |
