Image Fitness 5.0 Bench User Manual - Page 16
Cable Diagrams
 |
View all Image Fitness 5.0 Bench manuals
Add to My Manuals
Save this manual to your list of manuals |
Page 16 highlights
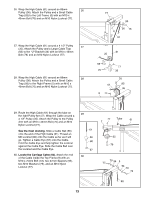
39. Attach the Low Cable (59) to the "U"-Bracket (33) 39 with an M6 Washers (62) and an M6 Locknut (80). Do not completely tighten the Locknut; it should be threaded onto the end of the Cable until only two threads are showing above the Locknut, as shown in the inset drawing. 33 80 59 59 33 80 62 40. Make sure all parts of the weight bench are properly tightened. In addition, pull each cable a few times to make sure the cables move smoothly over the pulleys. If the cables do not move smoothly, locate and correct the problem. When weights are used, the cables may be damaged if they are incorrectly routed. Refer to the CABLE DIAGRAMS below for correct cable routing. The use of all remaining parts will be explained in ADJUSTMENTS, beginning on the following page. CABLE DIAGRAMS The cable diagrams below show the proper routing of the Bench Cable (58), the Low Cable (59), the Carriage Cable (60), and the High Cable (61). Use the diagram to make sure that the cables and the cable traps have been assembled correctly. If the cables have not been correctly routed, the weight bench will not function properly and damage may occur. The numbers show the correct route for each cable. Make sure that the cable traps do not touch or bind the cables. 5 6 High Cable (61) 7 1 3 4 Carriage Cable (60) 3 2 5 1 4 2 3 5 2 1 3 Bench Cable (58) 4 Low Cable (59) 2 1 16
-
 1
1 -
2
-
3
-
4
-
5
-
6
-
7
-
8
-
9
-
10
-
 11
11 -
 12
12 -
 13
13 -
 14
14 -
 15
15 -
 16
16 -
 17
17 -
 18
18 -
 19
19 -
 20
20 -
 21
21 -
22
-
23
-
24
-
25
-
26
 |
 |
