Insignia NS-CL1112 User Manual (English) - Page 10
Making connections, Setting the clock
 |
UPC - 600603122088
View all Insignia NS-CL1112 manuals
Add to My Manuals
Save this manual to your list of manuals |
Page 10 highlights
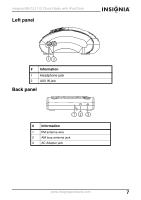
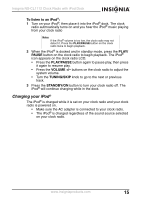
Insignia NS-CL1112 Clock Radio with iPod Dock 3 Close the battery compartment cover. Warnings • Do not recharge, short, disassemble, or heat the batteries, or dispose of in a fire. • Dispose of battery in the proper manner, according to federal, state, and local regulations. • Remove the batteries when the charge is depleted. • Battery chemicals can cause a rash. If the batteries leak, clean the battery compartment with a cloth. If chemicals touch your skin, wash immediately. Making connections Connecting the AC adapter Make sure that the AC power outlet matches the AC adapter's power specifications (100-240 V ~ 50-60 Hz) prior to plugging in the adapter. To connect the AC adapter: 1 Plug the small DC power connector into the AC adapter jack on the back of your clock radio. 2 Plug the AC adapter into an AC power outlet. Setting the clock To set the clock: 1 In standby mode, press and hold the CLK SET button on the top of your clock radio for two seconds. The hour format (12 or 24) is displayed on the LCD. 2 Turn the TUNING/SKIP knob to change the format between 12 and 24. 3 Press the CLK SET button again. The hour setting starts blinking. 4 Turn the TUNING/SKIP knob to change the hour setting. 5 Press the CLK SET button again. The minute setting starts blinking. 6 Turn the TUNING/SKIP knob to change the minute setting, then press the CLK SET button to store the setting. Note If no button is pressed for ten seconds, the clock radio exits clock setting mode without storing the setting. The clock is displayed in standby mode. To view the clock in radio mode, press and hold CLK SET for two seconds. Press it again to return to the normal display. 10 www.insigniaproducts.com
-
 1
1 -
2
-
3
-
4
-
 5
5 -
 6
6 -
 7
7 -
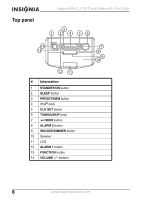 8
8 -
 9
9 -
 10
10 -
 11
11 -
 12
12 -
 13
13 -
 14
14 -
 15
15 -
16
-
17
-
18
-
19
-
20
-
21
 |
 |