Insignia NS-DFLMR1 Quick Setup Guide (English) - Page 1
Insignia NS-DFLMR1 Manual
 |
View all Insignia NS-DFLMR1 manuals
Add to My Manuals
Save this manual to your list of manuals |
Page 1 highlights
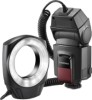
Quick Setup Guide | NS-DFLMR1 Macro Ring Flash PACKAGE CONTENTS • Macro ring flash • 6 lens adapters (49mm, 52mm, 55mm, 58mm, 62mm, 67mm) • Quick Setup Guide FEATURES • Compatible with all DSLR cameras with a flash hot-shoe • Can operate remotely with PC sync cable (not included) • 3.75" light ring with guide number of 10m at ISO 100 • Ideal for close-up photos • Five illumination power levels • Xenon flash tube lighting FEATURES 1 2 3 4 5 6 7 8 9 10 11 # Item Description 1 Ring Flash and mounting slot Attaches to your camera lens. 2 Power switch Slide to turn on or off. 3 Charging indicator Brightly lit- The ring flash is ready to use. Blinking every 1 second- Low battery. Blinking every 3 seconds - In sleep mode. Off - When the flash is turned off. 4 Flash level indicators Light to indicate the flash power level (1/16, 1/8, 1/4, 1/2 , or 1/1). 5 Battery compartment Insert 4 AA alkaline or Ni MH batteries (not included) 6 Flash level buttons Press + or - to select the flash power level. 7 Test button Press to test your flash. 8 PC sync socket Connect a PC Sync cable (not included) to trigger the flash from another device or to locate the flash control unit away from the camera. 9 External power pack terminal For use with optional external battery pack module (not included). 10 Locking ring Secures the control unit to your camera. 11 Lens adapters Allows you to mount the ring flash on your camera lens. INSERTING THE BATTERIES Note: Batteries are not included. 1 Slide the battery cover down, then lift up to open the battery compartment. 2 Insert 4 AA alkaline or NiMH Type batteries. Make sure that the + and - match what is indicated in the compartment. 3 Close the battery cover, then slide it up until it clicks into place.
-
 1
1 -
 2
2
 |
 |
