Insignia NS-HAIOR18 Quick Setup Guide - Page 1
Insignia NS-HAIOR18 Manual
 |
View all Insignia NS-HAIOR18 manuals
Add to My Manuals
Save this manual to your list of manuals |
Page 1 highlights
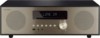
NS-HAIOR18_16-1139_QSG_V1_EN.ai 1 2/24/2017 10:49:11 AM QUICK SETUP GUIDE All-in-One Shelf System NS-HAIOR18 / NS-HAIOR18-C PACKAGE CONTENTS • All-in-One Shelf System • Power cord • FM antenna • Remote control • 2 AAA batteries • Quick Setup Guide FEATURES • 80W RMS total power for a superior listening experience • 20W RMS left and right channels play audio in surround sound • 40W RMS built-in subwoofer for rich bass • Bluetooth connects to devices wirelessly • FM tuner lets you listen to the radio • CD player provides a variety of audio options • USB port supports MP3 playback • 3.5 mm audio input connects to analog devices • Headphone jack enables private listening Before using your new product, please read these instructions to prevent any damage. FEATURES Front view SPEAKER Flat size (W×H): 431.8 × 279.4 mm.; Final folded size: 143.9 × 279.4 mm. V1 FINAL FOR PRINT REMOTE SENSOR DISPLAY SOURCE PLAY/PAUSE DISC SLOT VOLUME -/+ SPEAKER SETTING UP YOUR SHELF SYSTEM CONNECTING THE FM ANTENNA 1 Connect the FM antenna to the ANTENNA jack on the back of your shelf system. 2 Adjust the antenna until you find the best reception. Back panel AL M M 76 FM ANTENNA JACK The sub har rec Av PR FC Mo FM ANTENNA S Back panel STANDBY LINE IN PREVIOUS EJECT DISC USB PORT HEADPHONE NEXT JACK SUBWOOFER Remote control IC ID:10485A-HAIOR18 CAN ICES-3(B)/NMB-3(B) FM ANTENNA JACK AC POWER INPUT POWER ON/OFF STANDBY EJECT DISC REPEAT VOLUME + REWIND/ PREVIOUS/ TUNE - PRESET -/10 - INSTALLING THE REMOTE CONTROL BATTERIES 1 Remove the remote's battery cover. 2 Insert two AAA batteries into the compartment. Make sure that the + and - symbols on the battery match the symbols in the compartment. 3 Replace the cover. FOLDER -/DIM - CLOCK MUTE AUTO PRESET+ 10+ DIM+ PROG SOURCE AUTO/STOP PLAY/PAUSE FAST FORWARD/ NEXT/TUNE + VOLUME PRESET+/10+ FOLDER+/DIM+ ALARM/PROGRAM Equalizer mode TURNING ON YOUR SHELF SYSTEM 1 Connect the power cord to the AC jack on the back of your shelf system, then plug the other end into a power outlet. 2 Press the power switch on the back to turn your shelf system ON. Back panel IC ID:10485A-HAIOR18 CAN ICES-3(B)/NMB-3(B) 3 Press (standby) on your shelf system or remote. The shelf system greets you with "HELLO." Front view STANDBY SETTING THE CLOCK 1 In standby mode, press and hold CLOCK on your remote. Note: To enter standby mode, flip ON the power switch on the back of your shelf system, but do not press the standby button the front. 2 Press (previous) or (next) to select a 12-hour ("12H") or 24-hour ("24H") clock display, then press CLOCK to save. 3 Press (previous) or (next) to set the hour, then press CLOCK to save. 4 Press (previous) or (next) to set the minutes, then press CLOCK to save.
-
 1
1 -
 2
2
 |
 |
