Insignia NS-HTIB51A User Manual (English) - Page 9
Setting up your home, theater system - home theater
 |
View all Insignia NS-HTIB51A manuals
Add to My Manuals
Save this manual to your list of manuals |
Page 9 highlights
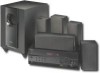
Insignia NS-HTIB51A 5.1 Channel Home Theater System Front, center, and surround speakers Front speakers Rear speakers B B C C D D CeSntCer s-p5ea1kAer BD C # Description 1 Keyhole slots 2 Speaker terminals 3 Threaded Inserts Function Used to wall-mount the speakers. These push terminals are for connecting the speaker to the receiver with the supplied speaker cables. These threaded inserts are for Init®-Home Theater Speaker Mounts NT-SWM series. Remote control Item Description 1 ON/STANDBY button 2 Remote mode input selector buttons Function Press to turn the power on to your receiver. Press again to go to standby mode. Press to directly select your receiver input source. Item Description 3 ENTER / / / TUNING+/- 4 SETUP button 5 LISTENING MODE buttons 6 D.TUN DIMMER 7 DISPLAY button 8 RECEIVER button 9 MUTING button 10 TUNE MODE button 11 VOL / buttons 12 CH +/- buttons ALBUM 13 RETURN button 14 AUDIO button 15 Number buttons 16 SLEEP/CLR button Function Press the arrow keys to navigate through the on-screen menus. Press ENTER to confirm a selection or setting. In tuning mode, press to tune to the next (TUNING+) or previous (TUNING-) station. Press to open the on-screen menus. Press to select the listening mode you want. See "Using the listening modes" on page 16 for additional information. In tuner mode, press D.TUN, then the number buttons to tune directly to a frequency. Press DIMMER to adjust the brightness of the display. Press repeatedly to cycle through the available input source information. Press to control the receiver. Press to mute the sound output from the receiver. Press to toggle between auto and manual tuning modes. Press to increase or decrease the sound volume. In tuner mode, press to go to the next or previous preset channel. In menu mode, press to return to the main menu. Press to access audio settings. See "Changing audio settings" on page 24. Press to enter a preset number or to manually tune the radio. Press repeatedly to select the sleep timer duration. In menu mode, press to clear an entry. Setting up your home theater system Finding a location for your home theater system • Install your home theater system on a stable flat surface. Position your receiver so that it has a direct line of sight to the remote control. • Do not expose your system to extremes of temperature or humidity. • Avoid placing your system on a hot surface such as on top of other hot running equipment. Make sure that there is adequate ventilation to your system. Caution Do not install the receiver in a confined space such as a bookcase. Caution Connect the AC cord only after the speakers, antenna, and all optional equipment have been connected. Never make or change any connections with the power turned on. www.insigniaproducts.com 5
-
 1
1 -
2
-
3
-
 4
4 -
 5
5 -
 6
6 -
 7
7 -
 8
8 -
 9
9 -
 10
10 -
 11
11 -
 12
12 -
 13
13 -
 14
14 -
15
-
16
-
17
-
18
-
19
-
20
-
21
-
22
-
23
-
24
-
25
-
26
-
27
-
28
-
29
-
30
-
31
-
32
-
33
-
34
-
35
-
36
-
37
-
38
-
39
-
40
 |
 |
