Insignia NS-R5101HD User Manual (English) - Page 8
Back, NS-R5101HD 5.1 Surround Sound Receiver
 |
View all Insignia NS-R5101HD manuals
Add to My Manuals
Save this manual to your list of manuals |
Page 8 highlights
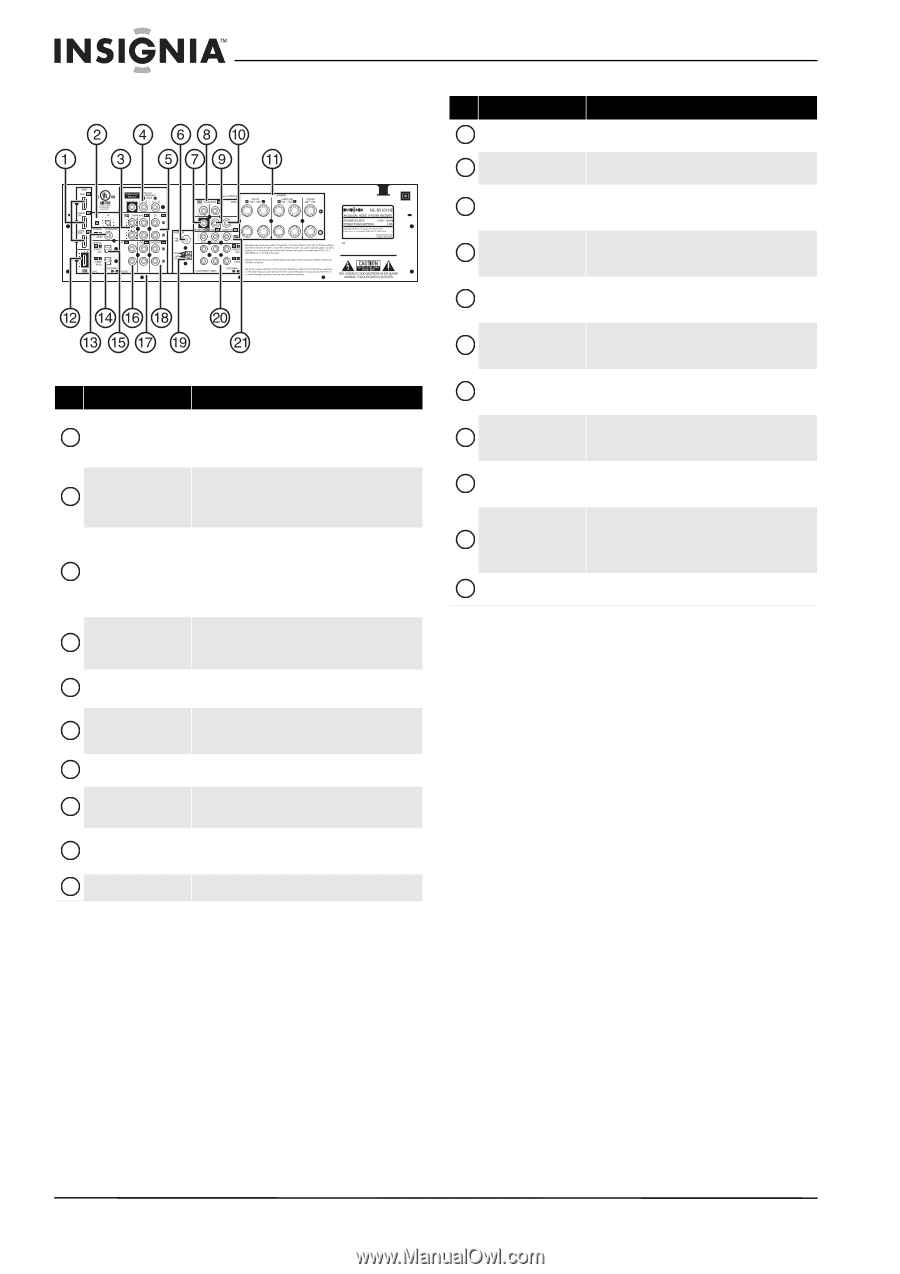
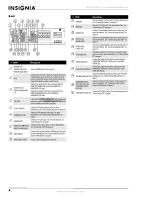
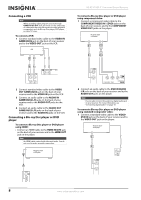
NS-R5101HD 5.1 Surround Sound Receiver Back # Item Description HDMI IN DVD 1 HDMI IN CABLE/SAT HDMI IN GAME/AUX2 2 IR IN AUDIO OUT L/R 3 AUDIO IN GAME/AUX2 L/R Connect HDMI devices to these jacks. Connect an IR receiver to this jack. Using an IR receiver is helpful when your receiver is in a cabinet or if you want to control the receiver from an area outside the range of the built-in remote control sensor. Connect the audio for the device connected to the VIDEO OUT GAME/AUX2 jack to the AUDIO OUT GAME/AUX2 L/R jacks. Connect the audio for the device connected to the VIDEO IN GAME/AUX2 jack to the AUDIO IN GAME/AUX2 L/R jacks. 4 PRE OUTs Connect the SUBWOOFER PRE OUT jack to a powered subwoofer and the SURROUND BACK PRE OUT to the power amplifier connected to speakers. 5 CD IN L/R AUDIO Connect a CD player to these jacks. For more information, see "Connecting a CD player" on page 10. 6 ANTENNA FM 75Ω Connect an FM antenna to this jack. For more information, see "Connecting an FM antenna" on page 6. 7 MONITOR OUT Connect a TV to this jack. For more information, see "Connecting a TV" on page 9. 8 VIDEO OUT GAME AUX2 Connect a VCR to these jacks. For more information, see "Connecting a VCR" on page 8. VIDEO IN GAME AUX2 9 VIDEO DVD IN Connect a Blu-ray Disc player or DVD player to this jack. For more information, see "Connecting a Blu-ray Disc player or DVD player" on page 8. 10 VIDEO CABLE/SAT IN Connect cable or satellite TV to this jack. # Item Description 11 SPEAKER Connect speakers to these jacks. For more information, see "Connecting speakers" on page 11. 12 HDMI OUT Connect a TV to this jack. For more information, see "Connecting a TV" on page 9. 13 COAXIAL IN1 Connect a coaxial digital audio device to this jack. For more information, see "Connecting digital audio" on page 10. 14 OPTICAL IN1 (GAME/AUX2) Connect an optical digital audio device to this jack. For more information, see "Connecting digital audio" on page 10. 15 OPTICAL IN2 (CABLE/SAT) Connect an optical digital audio device to this jack. For more information, see "Connecting digital audio" on page 10. 16 TV IN AUDIO L/R Connect the audio for a TV to hear its sound through your receiver. For more information, see "Connecting a TV" on page 9. 17 DVD IN AUDIO L/R Connect the audio for the device connected to the COMPONENT VIDEO IN 1 (DVD) jacks or the VIDEO DVD IN jack. Connect the audio for the device connected to the 18 CABLE/SAT IN AUDIO L/R COMPONENT VIDEO IN 2 (CABLE/SAT) jacks or the VIDEO DVD IN jack. Connect an AM loop antenna to these jacks. For more 19 ANTENNA GND/AM LOOP information, see "Connecting an AM antenna" on page 7. COMPONENT VIDEO 20 IN1 (CABLE/SAT) and COMPONENT VIDEO IN2 (DVD) Connect component video devices to these jacks. For more information, see "Connecting a Blu-ray Disc player or DVD player" on page 8. 21 COMPONENT VIDEO OUT Connect a TV to these jacks. For more information, see "Connecting a TV" on page 9. 4 www.insigniaproducts.com
-
 1
1 -
2
-
 3
3 -
 4
4 -
 5
5 -
 6
6 -
 7
7 -
 8
8 -
 9
9 -
 10
10 -
 11
11 -
 12
12 -
 13
13 -
14
-
15
-
16
-
17
-
18
-
19
-
20
-
21
-
22
-
23
-
24
-
25
-
26
-
27
-
28
-
29
-
30
 |
 |